2016年8月9日 星期二

CMake 入门实战

http://hahack.com/codes/cmake/


从实例入手,讲解 CMake 的常见用法。

什么是 CMake

All problems in computer science can be solved by another level of indirection.

David Wheeler
你或许听过好几种 Make 工具,例如 GNU Make ,QT 的 qmake ,微软的 MS nmake,BSD Make(pmake),Makepp,等等。这些 Make 工具遵循着不同的规范和标准,所执行的 Makefile 格式也千差万别。这样就带来了一个严峻的问题:如果软件想跨平台,必须要保证能够在不同平台编译。而如果使用上面的 Make 工具,就得为每一种标准写一次 Makefile ,这将是一件让人抓狂的工作。
CMake CMake图 1 CMake就是针对上面问题所设计的工具:它首先允许开发者编写一种平台无关的 CMakeList.txt 文件来定制整个编译流程,然后再根据目标用户的平台进一步生成所需的本地化 Makefile 和工程文件,如 Unix 的 Makefile 或 Windows 的 Visual Studio 工程。从而做到“Write once, run everywhere”。显然,CMake 是一个比上述几种 make 更高级的编译配置工具。一些使用 CMake 作为项目架构系统的知名开源项目有 VTK、ITK、KDE、OpenCV、OSG 等 [1]。

在 linux 平台下使用 CMake 生成 Makefile 并编译的流程如下:
  1. 编写 CMake 配置文件 CMakeLists.txt 。
  2. 执行命令 cmake PATH 或者 ccmake PATH 生成 Makefile 1 1ccmake 和 cmake 的区别在于前者提供了一个交互式的界面。。其中, PATH 是 CMakeLists.txt 所在的目录。
  3. 使用 make 命令进行编译。
本文将从实例入手,一步步讲解 CMake 的常见用法,文中所有的实例代码可以在这里找到。如果你读完仍觉得意犹未尽,可以继续学习我在文章末尾提供的其他资源。

入门案例:单个源文件


本节对应的源代码所在目录:Demo1。
对于简单的项目,只需要写几行代码就可以了。例如,假设现在我们的项目中只有一个源文件main.cc ,该程序的用途是计算一个数的指数幂。

1
2
3
4
5
6
7
8
9
10
11
12
13
14
15
16
17
18
19
20
21
22
23
24
25
26
27
28
29
30
31
32
33
34
35
36
37
38
#include <stdio.h>
#include <stdlib.h>
/**
* power - Calculate the power of number.
* @param base: Base value.
* @param exponent: Exponent value.
*
* @return base raised to the power exponent.
*/
double power(double base, int exponent)
{
int result = base;
int i;
if (exponent == 0) {
return 1;
}
for(i = 1; i < exponent; ++i){
result = result * base;
}
return result;
}
int main(int argc, char *argv[])
{
if (argc < 3){
printf("Usage: %s base exponent \n", argv[0]);
return 1;
}
double base = atof(argv[1]);
int exponent = atoi(argv[2]);
double result = power(base, exponent);
printf("%g ^ %d is %g\n", base, exponent, result);
return 0;
}

编写 CMakeLists.txt

首先编写 CMakeLists.txt 文件,并保存在与 main.cc 源文件同个目录下:

1
2
3
4
5
6
7
8
# CMake 最低版本号要求
cmake_minimum_required (VERSION 2.8)
# 项目信息
project (Demo1)
# 指定生成目标
add_executable(Demo main.cc)

CMakeLists.txt 的语法比较简单,由命令、注释和空格组成,其中命令是不区分大小写的。符号 # 后面的内容被认为是注释。命令由命令名称、小括号和参数组成,参数之间使用空格进行间隔。
对于上面的 CMakeLists.txt 文件,依次出现了几个命令:
  1. cmake_minimum_required:指定运行此配置文件所需的 CMake 的最低版本;
  2. project:参数值是 Demo1,该命令表示项目的名称是 Demo1 。
  3. add_executable: 将名为 main.cc 的源文件编译成一个名称为 Demo 的可执行文件。

编译项目

之后,在当前目录执行 cmake . ,得到 Makefile 后再使用 make 命令编译得到 Demo1 可执行文件。

1
2
3
4
5
6
7
8
9
10
11
12
13
14
15
16
17
18
19
20
21
22
23
24
25
[ehome@xman Demo1]$ cmake .
-- The C compiler identification is GNU 4.8.2
-- The CXX compiler identification is GNU 4.8.2
-- Check for working C compiler: /usr/sbin/cc
-- Check for working C compiler: /usr/sbin/cc -- works
-- Detecting C compiler ABI info
-- Detecting C compiler ABI info - done
-- Check for working CXX compiler: /usr/sbin/c++
-- Check for working CXX compiler: /usr/sbin/c++ -- works
-- Detecting CXX compiler ABI info
-- Detecting CXX compiler ABI info - done
-- Configuring done
-- Generating done
-- Build files have been written to: /home/ehome/Documents/programming/C/power/Demo1
[ehome@xman Demo1]$ make
Scanning dependencies of target Demo
[100%] Building C object CMakeFiles/Demo.dir/main.cc.o
Linking C executable Demo
[100%] Built target Demo
[ehome@xman Demo1]$ ./Demo 5 4
5 ^ 4 is 625
[ehome@xman Demo1]$ ./Demo 7 3
7 ^ 3 is 343
[ehome@xman Demo1]$ ./Demo 2 10
2 ^ 10 is 1024

多个源文件

同一目录,多个源文件


本小节对应的源代码所在目录:Demo2。
上面的例子只有单个源文件。现在假如把 power 函数单独写进一个名为 MathFunctions.c的源文件里,使得这个工程变成如下的形式:

1
2
3
4
5
6
7
./Demo2
|
+--- main.cc
|
+--- MathFunctions.cc
|
+--- MathFunctions.h

这个时候,CMakeLists.txt 可以改成如下的形式:

1
2
3
4
5
6
7
8
# CMake 最低版本号要求
cmake_minimum_required (VERSION 2.8)
# 项目信息
project (Demo2)
# 指定生成目标
add_executable(Demo main.cc MathFunctions.cc)

唯一的改动只是在 add_executable 命令中增加了一个 MathFunctions.cc 源文件。这样写当然没什么问题,但是如果源文件很多,把所有源文件的名字都加进去将是一件烦人的工作。更省事的方法是使用 aux_source_directory 命令,该命令会查找指定目录下的所有源文件,然后将结果存进指定变量名。其语法如下:

1
aux_source_directory(<dir> <variable>)

因此,可以修改 CMakeLists.txt 如下:

1
2
3
4
5
6
7
8
9
10
11
12
# CMake 最低版本号要求
cmake_minimum_required (VERSION 2.8)
# 项目信息
project (Demo2)
# 查找当前目录下的所有源文件
# 并将名称保存到 DIR_SRCS 变量
aux_source_directory(. DIR_SRCS)
# 指定生成目标
add_executable(Demo ${DIR_SRCS})

这样,CMake 会将当前目录所有源文件的文件名赋值给变量 DIR_SRCS ,再指示变量 DIR_SRCS 中的源文件需要编译成一个名称为 Demo 的可执行文件。

多个目录,多个源文件


本小节对应的源代码所在目录:Demo3。
现在进一步将 MathFunctions.h 和 MathFunctions.cc 文件移动到 math 目录下。

1
2
3
4
5
6
7
8
9
./Demo3
|
+--- main.cc
|
+--- math/
|
+--- MathFunctions.cc
|
+--- MathFunctions.h

对于这种情况,需要分别在项目根目录 Demo3 和 math 目录里各编写一个 CMakeLists.txt 文件。为了方便,我们可以先将 math 目录里的文件编译成静态库再由 main 函数调用。
根目录中的 CMakeLists.txt :

1
2
3
4
5
6
7
8
9
10
11
12
13
14
15
16
17
18
# CMake 最低版本号要求
cmake_minimum_required (VERSION 2.8)
# 项目信息
project (Demo3)
# 查找当前目录下的所有源文件
# 并将名称保存到 DIR_SRCS 变量
aux_source_directory(. DIR_SRCS)
# 添加 math 子目录
add_subdirectory(math)
# 指定生成目标
add_executable(Demo main.cc)
# 添加链接库
target_link_libraries(Demo MathFunctions)

该文件添加了下面的内容: 第3行,使用命令 add_subdirectory 指明本项目包含一个子目录 math,这样 math 目录下的 CMakeLists.txt 文件和源代码也会被处理 。第6行,使用命令 target_link_libraries 指明可执行文件 main 需要连接一个名为 MathFunctions 的链接库 。
子目录中的 CMakeLists.txt:

1
2
3
4
5
6
# 查找当前目录下的所有源文件
# 并将名称保存到 DIR_LIB_SRCS 变量
aux_source_directory(. DIR_LIB_SRCS)
# 生成链接库
add_library (MathFunctions ${DIR_LIB_SRCS})

在该文件中使用命令 add_library 将 src 目录中的源文件编译为静态链接库。

自定义编译选项


本节对应的源代码所在目录:Demo4。
CMake 允许为项目增加编译选项,从而可以根据用户的环境和需求选择最合适的编译方案。
例如,可以将 MathFunctions 库设为一个可选的库,如果该选项为 ON ,就使用该库定义的数学函数来进行运算。否则就调用标准库中的数学函数库。

修改 CMakeLists 文件

我们要做的第一步是在顶层的 CMakeLists.txt 文件中添加该选项:

1
2
3
4
5
6
7
8
9
10
11
12
13
14
15
16
17
18
19
20
21
22
23
24
25
26
27
28
29
30
# CMake 最低版本号要求
cmake_minimum_required (VERSION 2.8)
# 项目信息
project (Demo4)
# 加入一个配置头文件,用于处理 CMake 对源码的设置
configure_file (
"${PROJECT_SOURCE_DIR}/config.h.in"
"${PROJECT_BINARY_DIR}/config.h"
)
# 是否使用自己的 MathFunctions 库
option (USE_MYMATH
"Use provided math implementation" ON)
# 是否加入 MathFunctions 库
if (USE_MYMATH)
include_directories ("${PROJECT_SOURCE_DIR}/math")
add_subdirectory (math)
set (EXTRA_LIBS ${EXTRA_LIBS} MathFunctions)
endif (USE_MYMATH)
# 查找当前目录下的所有源文件
# 并将名称保存到 DIR_SRCS 变量
aux_source_directory(. DIR_SRCS)
# 指定生成目标
add_executable(Demo ${DIR_SRCS})
target_link_libraries (Demo ${EXTRA_LIBS})

其中:
  1. 第7行的 configure_file 命令用于加入一个配置头文件 config.h ,这个文件由 CMake 从 config.h.in 生成,通过这样的机制,将可以通过预定义一些参数和变量来控制代码的生成。
  2. 第13行的 option 命令添加了一个 USE_MYMATH 选项,并且默认值为 ON 。
  3. 第17行根据 USE_MYMATH 变量的值来决定是否使用我们自己编写的 MathFunctions 库。

修改 main.cc 文件

之后修改 main.cc 文件,让其根据 USE_MYMATH 的预定义值来决定是否调用标准库还是 MathFunctions 库:

1
2
3
4
5
6
7
8
9
10
11
12
13
14
15
16
17
18
19
20
21
22
23
24
25
26
27
28
29
30
#include
#include
#include "config.h"
#ifdef USE_MYMATH
#include "math/MathFunctions.h"
#else
#include
#endif
int main(int argc, char *argv[])
{
if (argc < 3){
printf("Usage: %s base exponent \n", argv[0]);
return 1;
}
double base = atof(argv[1]);
int exponent = atoi(argv[2]);
#ifdef USE_MYMATH
printf("Now we use our own Math library. \n");
double result = power(base, exponent);
#else
printf("Now we use the standard library. \n");
double result = pow(base, exponent);
#endif
printf("%g ^ %d is %g\n", base, exponent, result);
return 0;
}

编写 config.h.in 文件

上面的程序值得注意的是第2行,这里引用了一个 config.h 文件,这个文件预定义了 USE_MYMATH 的值。但我们并不直接编写这个文件,为了方便从 CMakeLists.txt 中导入配置,我们编写一个 config.h.in 文件,内容如下:

1
#cmakedefine USE_MYMATH

这样 CMake 会自动根据 CMakeLists 配置文件中的设置自动生成 config.h 文件。

编译项目

现在编译一下这个项目,为了便于交互式的选择该变量的值,可以使用 ccmake 命令 2 2也可以使用 cmake -i 命令,该命令会提供一个会话式的交互式配置界面。:
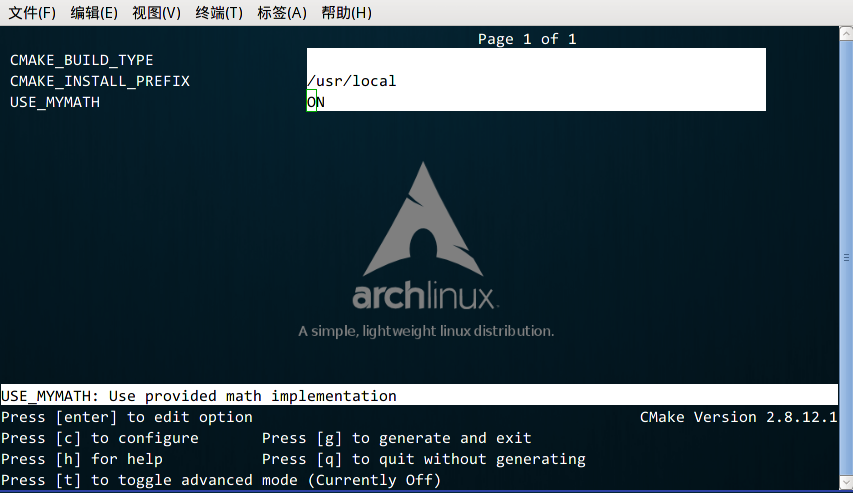
CMake的交互式配置界面
从中可以找到刚刚定义的 USE_MYMATH 选项,按键盘的方向键可以在不同的选项窗口间跳转,按下 enter 键可以修改该选项。修改完成后可以按下 c 选项完成配置,之后再按 g键确认生成 Makefile 。ccmake 的其他操作可以参考窗口下方给出的指令提示。
我们可以试试分别将 USE_MYMATH 设为 ON 和 OFF 得到的结果:
USE_MYMATH 为 ON
运行结果:

1
2
3
4
5
[ehome@xman Demo4]$ ./Demo
Now we use our own MathFunctions library.
7 ^ 3 = 343.000000
10 ^ 5 = 100000.000000
2 ^ 10 = 1024.000000

此时 config.h 的内容为:

1
#define USE_MYMATH

USE_MYMATH 为 OFF
运行结果:

1
2
3
4
5
[ehome@xman Demo4]$ ./Demo
Now we use the standard library.
7 ^ 3 = 343.000000
10 ^ 5 = 100000.000000
2 ^ 10 = 1024.000000

此时 config.h 的内容为:

1
/* #undef USE_MYMATH */

安装和测试


本节对应的源代码所在目录:Demo5。
CMake 也可以指定安装规则,以及添加测试。这两个功能分别可以通过在产生 Makefile 后使用 make install 和 make test 来执行。在以前的 GNU Makefile 里,你可能需要为此编写 install 和 test 两个伪目标和相应的规则,但在 CMake 里,这样的工作同样只需要简单的调用几条命令。

定制安装规则

首先先在 math/CMakeLists.txt 文件里添加下面两行:

1
2
3
# 指定 MathFunctions 库的安装路径
install (TARGETS MathFunctions DESTINATION bin)
install (FILES MathFunctions.h DESTINATION include)

指明 MathFunctions 库的安装路径。之后同样修改根目录的 CMakeLists 文件,在末尾添加下面几行:

1
2
3
4
# 指定安装路径
install (TARGETS Demo DESTINATION bin)
install (FILES "${PROJECT_BINARY_DIR}/config.h"
DESTINATION include)

通过上面的定制,生成的 Demo 文件和 MathFunctions 函数库 libMathFunctions.o 文件将会被复制到 /usr/local/bin 中,而 MathFunctions.h 和生成的 config.h 文件则会被复制到 /usr/local/include 中。我们可以验证一下3 3顺带一提的是,这里的 /usr/local/ 是默认安装到的根目录,可以通过修改 CMAKE_INSTALL_PREFIX变量的值来指定这些文件应该拷贝到哪个根目录。:

1
2
3
4
5
6
7
8
9
10
11
12
13
[ehome@xman Demo5]$ sudo make install
[ 50%] Built target MathFunctions
[100%] Built target Demo
Install the project...
-- Install configuration: ""
-- Installing: /usr/local/bin/Demo
-- Installing: /usr/local/include/config.h
-- Installing: /usr/local/bin/libMathFunctions.a
-- Up-to-date: /usr/local/include/MathFunctions.h
[ehome@xman Demo5]$ ls /usr/local/bin
Demo libMathFunctions.a
[ehome@xman Demo5]$ ls /usr/local/include
config.h MathFunctions.h

为工程添加测试

添加测试同样很简单。CMake 提供了一个称为 CTest 的测试工具。我们要做的只是在项目根目录的 CMakeLists 文件中调用一系列的 add_test 命令。

1
2
3
4
5
6
7
8
9
10
11
12
13
14
15
16
17
18
19
20
21
22
23
24
25
26
27
28
# 启用测试
enable_testing()
# 测试程序是否成功运行
add_test (test_run Demo 5 2)
# 测试帮助信息是否可以正常提示
add_test (test_usage Demo)
set_tests_properties (test_usage
PROPERTIES PASS_REGULAR_EXPRESSION "Usage: .* base exponent")
# 测试 5 的平方
add_test (test_5_2 Demo 5 2)
set_tests_properties (test_5_2
PROPERTIES PASS_REGULAR_EXPRESSION "is 25")
# 测试 10 的 5 次方
add_test (test_10_5 Demo 10 5)
set_tests_properties (test_10_5
PROPERTIES PASS_REGULAR_EXPRESSION "is 100000")
# 测试 2 的 10 次方
add_test (test_2_10 Demo 2 10)
set_tests_properties (test_2_10
PROPERTIES PASS_REGULAR_EXPRESSION "is 1024")

上面的代码包含了四个测试。第一个测试 test_run 用来测试程序是否成功运行并返回 0 值。剩下的三个测试分别用来测试 5 的 平方、10 的 5 次方、2 的 10 次方是否都能得到正确的结果。其中 PASS_REGULAR_EXPRESSION 用来测试输出是否包含后面跟着的字符串。
让我们看看测试的结果:

1
2
3
4
5
6
7
8
9
10
11
12
13
14
15
[ehome@xman Demo5]$ make test
Running tests...
Test project /home/ehome/Documents/programming/C/power/Demo5
Start 1: test_run
1/4 Test #1: test_run ......................... Passed 0.00 sec
Start 2: test_5_2
2/4 Test #2: test_5_2 ......................... Passed 0.00 sec
Start 3: test_10_5
3/4 Test #3: test_10_5 ........................ Passed 0.00 sec
Start 4: test_2_10
4/4 Test #4: test_2_10 ........................ Passed 0.00 sec
100% tests passed, 0 tests failed out of 4
Total Test time (real) = 0.01 sec

如果要测试更多的输入数据,像上面那样一个个写测试用例未免太繁琐。这时可以通过编写宏来实现:

1
2
3
4
5
6
7
8
9
10
11
# 定义一个宏,用来简化测试工作
macro (do_test arg1 arg2 result)
add_test (test_${arg1}_${arg2} Demo ${arg1} ${arg2})
set_tests_properties (test_${arg1}_${arg2}
PROPERTIES PASS_REGULAR_EXPRESSION ${result})
endmacro (do_test)
# 使用该宏进行一系列的数据测试
do_test (5 2 "is 25")
do_test (10 5 "is 100000")
do_test (2 10 "is 1024")

关于 CTest 的更详细的用法可以通过 man 1 ctest 参考 CTest 的文档。

支持 gdb

让 CMake 支持 gdb 的设置也很容易,只需要指定 Debug 模式下开启 -g 选项:

1
2
3
set(CMAKE_BUILD_TYPE "Debug")
set(CMAKE_CXX_FLAGS_DEBUG "$ENV{CXXFLAGS} -O0 -Wall -g -ggdb")
set(CMAKE_CXX_FLAGS_RELEASE "$ENV{CXXFLAGS} -O3 -Wall")

之后可以直接对生成的程序使用 gdb 来调试。

添加环境检查


本节对应的源代码所在目录:Demo6。
有时候可能要对系统环境做点检查,例如要使用一个平台相关的特性的时候。在这个例子中,我们检查系统是否自带 pow 函数。如果带有 pow 函数,就使用它;否则使用我们定义的 power 函数。

添加 CheckFunctionExists 宏

首先在顶层 CMakeLists 文件中添加 CheckFunctionExists.cmake 宏,并调用 check_function_exists 命令测试链接器是否能够在链接阶段找到 pow 函数。

1
2
3
# 检查系统是否支持 pow 函数
include (${CMAKE_ROOT}/Modules/CheckFunctionExists.cmake)
check_function_exists (pow HAVE_POW)

将上面这段代码放在 configure_file 命令前。

预定义相关宏变量

接下来修改 config.h.in 文件,预定义相关的宏变量。

1
2
// does the platform provide pow function?
#cmakedefine HAVE_POW

在代码中使用宏和函数

最后一步是修改 main.cc ,在代码中使用宏和函数:

1
2
3
4
5
6
7
#ifdef HAVE_POW
printf("Now we use the standard library. \n");
double result = pow(base, exponent);
#else
printf("Now we use our own Math library. \n");
double result = power(base, exponent);
#endif

添加版本号


本节对应的源代码所在目录:Demo7。
给项目添加和维护版本号是一个好习惯,这样有利于用户了解每个版本的维护情况,并及时了解当前所用的版本是否过时,或是否可能出现不兼容的情况。
首先修改顶层 CMakeLists 文件,在 project 命令之后加入如下两行:

1
2
set (Demo_VERSION_MAJOR 1)
set (Demo_VERSION_MINOR 0)

分别指定当前的项目的主版本号和副版本号。
之后,为了在代码中获取版本信息,我们可以修改 config.h.in 文件,添加两个预定义变量:

1
2
3
// the configured options and settings for Tutorial
#define Demo_VERSION_MAJOR @Demo_VERSION_MAJOR@
#define Demo_VERSION_MINOR @Demo_VERSION_MINOR@

这样就可以直接在代码中打印版本信息了:

1
2
3
4
5
6
7
8
9
10
11
12
13
14
15
16
17
18
19
20
21
22
23
24
25
26
27
28
29
30
31
#include <stdio.h>
#include <stdlib.h>
#include <math.h>
#include "config.h"
#include "math/MathFunctions.h"
int main(int argc, char *argv[])
{
if (argc < 3){
// print version info
printf("%s Version %d.%d\n",
argv[0],
Demo_VERSION_MAJOR,
Demo_VERSION_MINOR);
printf("Usage: %s base exponent \n", argv[0]);
return 1;
}
double base = atof(argv[1]);
int exponent = atoi(argv[2]);
#if defined (HAVE_POW)
printf("Now we use the standard library. \n");
double result = pow(base, exponent);
#else
printf("Now we use our own Math library. \n");
double result = power(base, exponent);
#endif
printf("%g ^ %d is %g\n", base, exponent, result);
return 0;
}

生成安装包


本节对应的源代码所在目录:Demo8。
本节将学习如何配置生成各种平台上的安装包,包括二进制安装包和源码安装包。为了完成这个任务,我们需要用到 CPack ,它同样也是由 CMake 提供的一个工具,专门用于打包。
首先在顶层的 CMakeLists.txt 文件尾部添加下面几行:

1
2
3
4
5
6
7
# 构建一个 CPack 安装包
include (InstallRequiredSystemLibraries)
set (CPACK_RESOURCE_FILE_LICENSE
"${CMAKE_CURRENT_SOURCE_DIR}/License.txt")
set (CPACK_PACKAGE_VERSION_MAJOR "${Demo_VERSION_MAJOR}")
set (CPACK_PACKAGE_VERSION_MINOR "${Demo_VERSION_MINOR}")
include (CPack)

上面的代码做了以下几个工作:
  1. 导入 InstallRequiredSystemLibraries 模块,以便之后导入 CPack 模块;
  2. 设置一些 CPack 相关变量,包括版权信息和版本信息,其中版本信息用了上一节定义的版本号;
  3. 导入 CPack 模块。
接下来的工作是像往常一样构建工程,并执行 cpack 命令。
  • 生成二进制安装包:

1
cpack -C CPackConfig.cmake

  • 生成源码安装包

1
cpack -C CPackSourceConfig.cmake

我们可以试一下。在生成项目后,执行 cpack -C CPackConfig.cmake 命令:

1
2
3
4
5
6
7
8
9
10
11
12
13
14
15
16
17
18
19
[ehome@xman Demo8]$ cpack -C CPackSourceConfig.cmake
CPack: Create package using STGZ
CPack: Install projects
CPack: - Run preinstall target for: Demo8
CPack: - Install project: Demo8
CPack: Create package
CPack: - package: /home/ehome/Documents/programming/C/power/Demo8/Demo8-1.0.1-Linux.sh generated.
CPack: Create package using TGZ
CPack: Install projects
CPack: - Run preinstall target for: Demo8
CPack: - Install project: Demo8
CPack: Create package
CPack: - package: /home/ehome/Documents/programming/C/power/Demo8/Demo8-1.0.1-Linux.tar.gz generated.
CPack: Create package using TZ
CPack: Install projects
CPack: - Run preinstall target for: Demo8
CPack: - Install project: Demo8
CPack: Create package
CPack: - package: /home/ehome/Documents/programming/C/power/Demo8/Demo8-1.0.1-Linux.tar.Z generated.

此时会在该目录下创建 3 个不同格式的二进制包文件:

1
2
[ehome@xman Demo8]$ ls Demo8-*
Demo8-1.0.1-Linux.sh Demo8-1.0.1-Linux.tar.gz Demo8-1.0.1-Linux.tar.Z

这 3 个二进制包文件所包含的内容是完全相同的。我们可以执行其中一个。此时会出现一个由 CPack 自动生成的交互式安装界面:

1
2
3
4
5
6
7
8
9
10
11
12
13
14
15
16
17
18
19
20
21
22
23
24
25
26
27
28
29
30
31
32
33
34
35
36
37
38
39
40
[ehome@xman Demo8]$ sh Demo8-1.0.1-Linux.sh
Demo8 Installer Version: 1.0.1, Copyright (c) Humanity
This is a self-extracting archive.
The archive will be extracted to: /home/ehome/Documents/programming/C/power/Demo8
If you want to stop extracting, please press <ctrl-C>.
The MIT License (MIT)
Copyright (c) 2013 Joseph Pan(http://hahack.com)
Permission is hereby granted, free of charge, to any person obtaining a copy of
this software and associated documentation files (the "Software"), to deal in
the Software without restriction, including without limitation the rights to
use, copy, modify, merge, publish, distribute, sublicense, and/or sell copies of
the Software, and to permit persons to whom the Software is furnished to do so,
subject to the following conditions:
The above copyright notice and this permission notice shall be included in all
copies or substantial portions of the Software.
THE SOFTWARE IS PROVIDED "AS IS", WITHOUT WARRANTY OF ANY KIND, EXPRESS OR
IMPLIED, INCLUDING BUT NOT LIMITED TO THE WARRANTIES OF MERCHANTABILITY, FITNESS
FOR A PARTICULAR PURPOSE AND NONINFRINGEMENT. IN NO EVENT SHALL THE AUTHORS OR
COPYRIGHT HOLDERS BE LIABLE FOR ANY CLAIM, DAMAGES OR OTHER LIABILITY, WHETHER
IN AN ACTION OF CONTRACT, TORT OR OTHERWISE, ARISING FROM, OUT OF OR IN
CONNECTION WITH THE SOFTWARE OR THE USE OR OTHER DEALINGS IN THE SOFTWARE.
Do you accept the license? [yN]:
y
By default the Demo8 will be installed in:
"/home/ehome/Documents/programming/C/power/Demo8/Demo8-1.0.1-Linux"
Do you want to include the subdirectory Demo8-1.0.1-Linux?
Saying no will install in: "/home/ehome/Documents/programming/C/power/Demo8" [Yn]:
y
Using target directory: /home/ehome/Documents/programming/C/power/Demo8/Demo8-1.0.1-Linux
Extracting, please wait...
Unpacking finished successfully

完成后提示安装到了 Demo8-1.0.1-Linux 子目录中,我们可以进去执行该程序:

1
2
3
[ehome@xman Demo8]$ ./Demo8-1.0.1-Linux/bin/Demo 5 2
Now we use our own Math library.
5 ^ 2 is 25

关于 CPack 的更详细的用法可以通过 man 1 cpack 参考 CPack 的文档。

将其他平台的项目迁移到 CMake

CMake 可以很轻松地构建出在适合各个平台执行的工程环境。而如果当前的工程环境不是 CMake ,而是基于某个特定的平台,是否可以迁移到 CMake 呢?答案是可能的。下面针对几个常用的平台,列出了它们对应的迁移方案。

autotools

qmake

Visual Studio

  • vcproj2cmake.rb 可以根据 Visual Studio 的工程文件(后缀名是 .vcproj 或.vcxproj)生成 CMakeLists.txt 文件。
  • vcproj2cmake.ps1 vcproj2cmake 的 PowerShell 版本。
  • folders4cmake 根据 Visual Studio 项目文件生成相应的 “source_group” 信息,这些信息可以很方便的在 CMake 脚本中使用。支持 Visual Studio 9/10 工程文件。

CMakeLists.txt 自动推导

  • gencmake 根据现有文件推导 CMakeLists.txt 文件。
  • CMakeListGenerator 应用一套文件和目录分析创建出完整的 CMakeLists.txt 文件。仅支持 Win32 平台。

相关链接

  1. 官方主页
  2. 官方文档
  3. 官方教程
  4. Wiki
  5. FAQ
  6. bug tracker
  7. 邮件列表:
  8. 其他推荐文章

类似工具

  • SCons:Eric S. Raymond、Timothee Besset、Zed A. Shaw 等大神力荐的项目架构工具。和 CMake 的最大区别是使用 Python 作为执行脚本。


  1. 这个页面详细罗列了使用 CMake 的知名项目 ↩

2016年7月29日 星期五

Protocol Buffer for Python 教学

这篇文章会介绍

一:如何定义proto讯息格式
二:使用protocol buffer编译器
三:视同protocol buffer读写信息

为什么要使用protocol buffer?

这个例子使用一个非常简单的联络薄,允许读写。每笔资料代表一个人的名字,ID,邮箱地址及电话号码。

要如何把这些资料序列化及读取?我们有以下几个方法:

使用Python Pickle。这是Python预设的方法,可是这个方法不能有效处理Schema改动,而且要与C++及Java程序交换资料很难。

发明一个方法把资料变成字串,举例,4个整数可以变成“12:3”-23:67“。虽然这歌方法不能提供一次性编码及解析代码,而且解析需要一点运行成本,可是这个方法很简单有弹性,适合一些很简单的资料。

把资料序列化为XML,这很吸引因为XML是人类可读的,而且很多不同语言都支持。如果你要把资料分享给其他应用,XML是一个很好的选择。可是,XML空间要求巨大,早就臭名远播,而且编码对性能的负面影响很,XML DOM树明显比简单的读取一个class field来的复杂很多。

Protocol Buffer刚好可以解决这个问题。有了Protocol buffer,我们可以把资料结构写进一个proto描述档案,使用protocol buffer编译器从这个proto档产生class档案并且拥有一个高效率二进制而自动产生出来的编码及解析代码。产生出来的class提供getter及setter,处理读写细节。更重要的是,protocol buffer格式支持随着时间的格式延伸,代码可以读取使用就格式编码的资料。

定义你的协议格式

要建立一个联络薄应用,首先要从proto档案开始,首先加为每个资料结构加入一个message,然后为每个属性建立一个名字跟形态。看以下例子。

package tutorial;

message Person {
  required string name = 1;
  required int32 id = 2;
  optional string email = 3;

  enum PhoneType {
    MOBILE = 0;
    HOME = 1;
    WORK = 2;
  }

  message PhoneNumber {
    required string number = 1;
    optional PhoneType type = 2 [default = HOME];
  }

  repeated PhoneNumber phone = 4;
}

message AddressBook {
  repeated Person person = 1;
}

可以看到,文法跟C++及Java很像似。详细解释如下。

首先,一开始写一个package宣告,用来避免将来有可能出现的名字冲突。在Python里面,packages一般用资料夹结构去决定,所以在这个proto档案里使用package并不会影响产生出来的代码。可是,你还是应该宣告一个package去避免在各个protocol buffer名字空间的名字冲突以及避免Python意外的语言的名字冲突。

然后,进入messsage定义部分。一个message集合了一堆有形态的属性。很多的简单形态都可以使用,包括bool,int32,float,double,string。你也可以使用自定义形态。上面的例子Person就包含了PhoneNumber这个形态。你也可以定义enum形态去限制PhoneNumber的type为MOBILE,HOME,WORK其中之一。

你看到的“=1”,“=2”标记是用来识别独一无二的tag并用于二进制编码里面。tag号码1-15比正常的编码使用省1字节,因此如果要要优化的话我们可以决定把常用或者重复的元素予以1-15的tag,而16以上的tag留给不常见可有可无的元素。每个重复的元素要求把tag号码重新编码,所以重复的属性特别适合使用这个优化方法。

每个属性必须要用一下其中一个方法去描述一下:

required:必须提供一个数值给这个属性,否则这个message会被认为是未初始化。序列化一个未初始化的message会引起一个例外。解析一个未初始化的message会失败。除此以外,required属性跟optional属性一模一样。

optional:这个属性可以设定也可以不。如果没设定的话,预设值会被使用。简单的类型,我们可以指明预设值。举上例,phone number type预设使用HOME。如果没有指明预设值,系统预设值会被使用:数值类型用0,字串类型用空字串,布朗值用否。使用embedded messages的话,预设值永远是message的“default instance“或者”prototype“并且不会设置任何一个属性。如果用accessor向一个为设定的属性取值的话,会返回那个属性的预设值。

repeated:这个属性可能会重复0次或多次,就是可有可无的意思。重复的数值的顺序会被保留。可以把重复属性想象成动态大小的数列。

Required代表永远
使用required的时候要特别小心,如果某天打算停止写入及读取某个required属性,想把它从required改成optional将会产生很大问题。旧的读取者会认为缺少这个属性的message为不完整并且有可能漫无目的地拒绝或者扔掉这些messages。我们应该考虑使用特别为应用建立的检查有效性的代码取而代之。Google某些工程师得出以下结论:使用required斃多于利,他们倾向只使用optional及repeated。可是这个观点并不能一概而论。

把protocol buffer编译
看完proto档案怎么编写,现在可以编译了。首先你要看一大堆文章把protoc编译器安装好。直到有一天你在command line可以顺利跑protoc --version,你便算是安装好编译器了。
复杂点:protoc -I=$SRC_DIR --python_out=$DST_DIR $SRC_DIR/addressbook.proto
简单点:protoc --python_out=. addressbook.proto
然后就会看见产生出来的档案addressbook_pb2.py

Protocol Buffer API
与C++及Java的代码产生不同,Python protocol buffer编译器不会为你直接产生资料提取代码,却会为所有messages,enums,fields及某些神秘的空类产生特别的描述器。
class Person(message.Message):
  __metaclass__ = reflection.GeneratedProtocolMessageType

  class PhoneNumber(message.Message):
    __metaclass__ = reflection.GeneratedProtocolMessageType
    DESCRIPTOR = _PERSON_PHONENUMBER
  DESCRIPTOR = _PERSON

class AddressBook(message.Message):
  __metaclass__ = reflection.GeneratedProtocolMessageType
  DESCRIPTOR = _ADDRESSBOOK
其中最重要的一行__metaclass__ = reflection.GeneratedProtocolMessageType详细如何工作不再此述,我们可以把它暂时把它想象成一个建立类的模板。在载入的时候,GeneratedProtocolMessageType元类视同特定的描述器为所有我们需要用到的讯息的产生相应的Python方法及相关的类。
你可以使用Person类犹如每个field已经定义在Message一样,例如
import addressbook_pb2
person = addressbook_pb2.Person()
person.id = 1234
person.name = "John Doe"
person.email = "jdoe@example.com"
phone = person.phone.add()
phone.number = "555-4321"
phone.type = addressbook_pb2.Person.HOME
留意以上这些assingments并不是单纯把一些随意的field加到generic Python物件里面的。如果你尝试assign一些还没有在proto档定义的field,系统会抛出AttributeError。如果assign错type,系统会抛出TypeError。读取未设定的field将会返回预设值。
person.no_such_field = 1  # raises AttributeError
person.id = "1234"        # raises TypeError
Enums
addressbook_pb2.Person.WOKR拥有2的值。

Standard Message Methods
每个讯息类别都有一堆方法让你检查及操作这个类的。
IsInitialized():检查是不是所有fields都已经赋值了
__str__():返回human-readable的字串,侦错时特有效,例如str(message) or pirnt(message)
CopyFrom(other_msg):覆盖当前讯息
Clear():清空为空的状态
这几个方法都是implement了class Message的界面。

Parsing and Serialization
每个protocol buffer class都有使用protocol buffer binary format方法去读写。
SerializeToString():讯息变字串。留意那些字节都是binary而不是text。我们仅仅用str type作为一个方便的container
ParseFromString():string变讯息

Protocol Buffers and OO Design
Protocol Buffer class 仅仅是资料类别,不要当成object model。如果想要更丰富的behaviour,最好的方法是wrap掉protocol buffer class成为applicationg-specific class。如果对于proto档案没有控制权的开发者,warpping也是很好的方法,因为我们可以隐藏某些不扼要的资料跟方法,并且暴露有用的方法。记住,永远不要用继承产生出来的class去增加或者改变class的行为,这样会打破内部机制。

Writing A Message
以下例子首先从档案读取AddressBook,添加一个Person,把新的AddressBook写进档案。黄色的是跟protocol compiler产生出来的代码有关的。
#! /usr/bin/python

import addressbook_pb2
import sys

# This function fills in a Person message based on user input.
def PromptForAddress(person):
  person.id = int(raw_input("Enter person ID number: "))
  person.name = raw_input("Enter name: ")

  email = raw_input("Enter email address (blank for none): ")
  if email != "":
    person.email = email

  while True:
    number = raw_input("Enter a phone number (or leave blank to finish): ")
    if number == "":
      break

    phone_number = person.phone.add()
    phone_number.number = number

    type = raw_input("Is this a mobile, home, or work phone? ")
    if type == "mobile":
      phone_number.type = addressbook_pb2.Person.MOBILE
    elif type == "home":
      phone_number.type = addressbook_pb2.Person.HOME
    elif type == "work":
      phone_number.type = addressbook_pb2.Person.WORK
    else:
      print "Unknown phone type; leaving as default value."

# Main procedure:  Reads the entire address book from a file,
#   adds one person based on user input, then writes it back out to the same
#   file.
if len(sys.argv) != 2:
  print "Usage:", sys.argv[0], "ADDRESS_BOOK_FILE"
  sys.exit(-1)

address_book = addressbook_pb2.AddressBook()

# Read the existing address book.
try:
  f = open(sys.argv[1], "rb")
  address_book.ParseFromString(f.read())
  f.close()
except IOError:
  print sys.argv[1] + ": Could not open file.  Creating a new one."

# Add an address.
PromptForAddress(address_book.person.add())

# Write the new address book back to disk.
f = open(sys.argv[1], "wb")
f.write(address_book.SerializeToString())
f.close()
Extending a Protocol Buffer
往后当我们需要改进protocol buffer定义时候,如果需要让新buffer往前兼容并且让旧buffer往前兼容,有些规矩需要遵守的。
1. 一定不可以更改现有的任何tag number
2. 一定不可以加减任何required fields
3. 可以删除optional或者repeated fields
4. 可以增加新的optional或者repeated fields但是一定要用全新的tag numbers, 全新的意思是那些永远未被使用过的tag numbers,连删除了的fields也不曾使用过的

如果乖乖的遵守以上规条,旧代码会快乐的读取新讯息以及忽略新fields,因为对于旧代码来说,删除了的optional fields会有default values,而删除了的repeated fields会变成empty。新代码会读取就信息。可是,旧讯息一定不会存在任何新的optional fields,所以,要嘛用has_故意检查他们是否已经设定好,要嘛用[default=value]去提供一个合理的预设值。如果optional fields没有提供预设值,系统会给一个:空,否,零。如果新加了repeated field,新代码不能判断到底是新代码设定为空的,还是就代码没有设定,因为repeated field没有 has_ field。


2016年7月27日 星期三

Install Protocol Buffers for Python on CentOS 6.7 and Windows 7


Install protoc on CentOS 6.7

Clone the repo
git clone https://github.com/google/protobuf.git

Below is to follow here
https://github.com/google/protobuf/blob/master/src/README.md

Install tools
sudo yum install -y autoconf automake libtool curl make g++ unzip

Generate configure script
cd protobuf
./autogen.sh

Build C++ runtime and protoc
./configure --prefix=/usr
make
make check
sudo make install
sudo ldconfig # refresh shared library cache.

Test
protoc --version
libprotoc 3.0.0


Install Protocol Buffers for Python on Centos 6.7

Download and install it
wget https://github.com/google/protobuf/releases/download/v3.0.0-beta-4/protobuf-python-3.0.0-beta-4.tar.gz
tar -zxvf protobuf-python-3.0.0-beta-4.tar.gz
cd protobuf-3.0.0-beta-4/
cd python
python setup.py build
python setup.py test
python setup.py install (as root)


Install protoc.exe on Windows 7
Extract and place protoc.exe to C:\Windows\

Test
protoc --version
libprotoc 3.0.0

Install Protocol Buffers for Python on Windows 7

Protobuf for Python
Extract, go to ./python folder
python setup.py build
python setup.py test
python setup.py install (as root)


Test Protocol Buffers for Python on CentOS 6.7 and Windows 7

Create proto file
Create a file called Order.proto with following content
syntax="proto2";
message Order
{
  required int32 time = 1;
  required int32 userid = 2;
  required float price = 3;
  optional string desc = 4;
}

Generate .py file
protoc --python_out=. Order.proto

Create main.py
Create a file called main.py with following content
from Order_pb2 import *
if __name__=='__main__':
    order = Order()
    order.time = 123
    order.userid = 456
    order.price = 78.9
    order.desc = "here"
    print ('order', order)
    print ('time', order.time)
    print ('userid', order.userid)
    print ('price', order.price)
    print ('desc', order.desc)

Run main.py
D:\Lab\ProtocolBuffers>python main.py
order time: 123
userid: 456
price: 78.9
desc: "here"

time 123
userid 456
price 78.9
desc here

2016年7月15日 星期五

SQLite Database Browser on CentOS6

http://blog.thememoryleak.net/2013/02/sqlite-database-browser-on-centos6.html

SQLite Database Browser on CentOS6

Working through Michael Hartl's Ruby on Rails Tutorial, chapter 6 calls for the SQLite Database Browser.

Just wanted to put a note out there for anyone building this on CentOS6: make sure you check the version of qt that your qmake command runs against.

The below commands show how to check which version you're using, and run the correct one to build Sqlite Database Browser.

check installed qt versions
[user@dev-workstation sqlitebrowser]$ which qmake
/usr/lib64/qt-3.3/bin/qmake
[user@dev-workstation sqlitebrowser]$ ls /usr/lib64/qt*
/usr/lib64/qt-3.3:
bin  include  lib  mkspecs  phrasebooks  plugins  translations

/usr/lib64/qt4:
bin  mkspecs  phrasebooks  plugins  q3porting.xml

confirm qt4/bin/qmake is there
[user@dev-workstation sqlitebrowser]$ ls /usr/lib64/qt4/bin/qmake
/usr/lib64/qt4/bin/qmake

commands to run to build Sqlite Database Browser
[user@dev-workstation sqlitebrowser]$ /usr/lib64/qt4/bin/qmake
[user@dev-workstation sqlitebrowser]$ make

after building, move to your ~/bin folder and enjoy
[user@dev-workstation sqlitebrowser]$ cp sqlitebrowser ~/bin/
[user@dev-workstation sqlitebrowser]$ which sqlitebrowser
~/bin/sqlitebrowser
[user@dev-workstation sqlitebrowser]$ sqlitebrowser &
[user@dev-workstation sqlitebrowser]$

hope this helps. :)

2007 to 2023 HP and Dell Servers Comparison

  HP Gen5 to Gen11  using ChatGPT HP ProLiant Gen Active Years CPU Socket Popular HP CPUs Cores Base Clock Max RAM Capacity Comparable Dell ...