2016年9月20日 星期二

Using Boost 1.54 on Windows 7 For Visual Studio 2013


Tutorial
http://www.boost.org/doc/libs/1_54_0/more/getting_started/windows.html


Download
http://sourceforge.net/projects/boost/files/boost/1.54.0/boost_1_54_0.7z
File size is 51.3 MB compressed and 373MB uncompressed.

Extract
So that the file structure is in form of C:\Program Files\boost\boost_1_54_0\index.htm

Visual Studio Project
Use Visual Studio 2013 > File > New > Project > Visual Studio C++ > Win32 Console Application > Empty

Setup Include Path
<ProjectName> > Right Click > Properties > C/C++ > General > Additional Include Directories >
C:\Program Files\boost\boost_1_54_0\


Header-only Boost.Lambda Code
#include <boost/lambda/lambda.hpp>
#include <iostream>
#include <iterator>
#include <algorithm>
int main() {
       using namespace boost::lambda;
       typedef std::istream_iterator<int> in;
       std::for_each(in(std::cin), in(), std::cout << (_1 * 3) << " ");
}


Test
Press F5 to compile and run, enter 1 to return 3


Build Boost
cmd.exe
cd C:\Program Files\boost\boost_1_54_0
bootstrap.bat
./b2.exe toolset=msvc-12.0
Running b2.exe takes very long time from 4:49 PM to 5:18 PM or near 30 minutes on my Intel i5-4440 3.1 Ghz 16GB Windows 7 64 bits. While building, it generates additional 3.2 GB of files mainly in .obj, .lib and .rsp in stage and bin.v2 folders.

Build Version 2
Use VS2013 x64 本机工具命令提示
%comspec% /k ""C:\Program Files (x86)\Microsoft Visual Studio 12.0\VC\vcvarsall.bat"" amd64
bootstrap.bat
b2.exe toolset=msvc-12.0


Generated Files
In folder \bin.v2\libs, the generated .lib file prefixed with libboost_. The following libraries are generated.
atomic chrono context coroutine date_time exception filesystem graph iostreams locale log math prg_exec_monitor program_options python3 random regex serialization signals system test_exec_monitor thread timer unit_test_framework wave wserialization


Compiled-binary Boost.Regex Code
#include <boost/regex.hpp>
#include <iostream>
#include <string>
int main() {
       std::string line;
       boost::regex pat("^Subject: (Re: |Aw: )*(.*)");
       while (std::cin) {
              std::getline(std::cin, line);
              boost::smatch matches;
              if (boost::regex_match(line, matches, pat))
                     std::cout << matches[2] << std::endl;
       }

}

Auto-Linking
Visual Studio supports auto-linking that while build the above code, the name of library will be detected.
For Debug Win32 project, it searches for 'libboost_regex-vc110-mt-gd-1_54.lib'
For Release Win32 project, it searches for 'libboost_regex-vc110-mt-1_54.lib'
<ProjectName> > Right Click > Linker > Additional Library Directories > C:\Program Files\boost\boost_1_54_0\stage\lib\

Potential Error
Error 1 error LNK2038: mismatch detected for '_MSC_VER': value '1700' doesn't match value '1800' in main.obj D:\public\boostexample\boostexample\libboost_regex-vc110-mt-gd-1_54.lib(instances.obj) boostexample

You need to build it with correct version of toolset for b2.exe in previous steps.


2016年9月9日 星期五

Loop ping in Windows using Python 3

import subprocess

def ping(hostname):
  output = subprocess.Popen(["ping.exe", hostname, "-n", "1"], stdout = subprocess.PIPE).communicate()[0]
txt = output.decode('ascii')
return txt

for i in range(140, 200):
  hostname = "10.1.10." + str(i)
output = ping(hostname)
print(hostname, 'unreachable'
  not in output)

2016年9月2日 星期五

Linux Check Hardware and Network Commands

[quantprod@hkoffice083 network-scripts]$ ifconfig
em1: flags=4163<UP,BROADCAST,RUNNING,MULTICAST>  mtu 1500
        inet 10.1.10.183  netmask 255.255.255.0  broadcast 10.1.10.255
        ether a4:ba:db:50:66:64  txqueuelen 1000  (Ethernet)
        RX packets 672507  bytes 156314638 (149.0 MiB)
        RX errors 0  dropped 1565  overruns 0  frame 0
        TX packets 2342106  bytes 3009870528 (2.8 GiB)
        TX errors 0  dropped 0 overruns 0  carrier 0  collisions 0

em2: flags=4099<UP,BROADCAST,MULTICAST>  mtu 1500
        ether a4:ba:db:50:66:65  txqueuelen 1000  (Ethernet)
        RX packets 0  bytes 0 (0.0 B)
        RX errors 0  dropped 0  overruns 0  frame 0
        TX packets 0  bytes 0 (0.0 B)
        TX errors 0  dropped 0 overruns 0  carrier 0  collisions 0

lo: flags=73<UP,LOOPBACK,RUNNING>  mtu 65536
        inet 127.0.0.1  netmask 255.0.0.0
        loop  txqueuelen 0  (Local Loopback)
        RX packets 161360  bytes 14142796 (13.4 MiB)
        RX errors 0  dropped 0  overruns 0  frame 0
        TX packets 161360  bytes 14142796 (13.4 MiB)
        TX errors 0  dropped 0 overruns 0  carrier 0  collisions 0

[quantprod@hkoffice083 network-scripts]$ netstat -lntu
Active Internet connections (only servers)
Proto Recv-Q Send-Q Local Address           Foreign Address         State
tcp        0      0 0.0.0.0:15022           0.0.0.0:*               LISTEN
tcp        0      0 0.0.0.0:15023           0.0.0.0:*               LISTEN
tcp        0      0 0.0.0.0:59001           0.0.0.0:*               LISTEN
tcp        0      0 0.0.0.0:59002           0.0.0.0:*               LISTEN
tcp        0      0 0.0.0.0:8899            0.0.0.0:*               LISTEN
tcp        0      0 0.0.0.0:8900            0.0.0.0:*               LISTEN
tcp        0      0 0.0.0.0:1988            0.0.0.0:*               LISTEN
tcp        0      0 0.0.0.0:2020            0.0.0.0:*               LISTEN
udp        0      0 10.1.10.183:123         0.0.0.0:*
udp        0      0 127.0.0.1:123           0.0.0.0:*
udp        0      0 0.0.0.0:123             0.0.0.0:*
udp        0      0 0.0.0.0:55405           0.0.0.0:*

[quantprod@hkoffice083 network-scripts]$ cat ifcfg-em1
TYPE=Ethernet
BOOTPROTO=static
NAME=em1
UUID=c4d5d83d-4991-4623-9422-025804d6ca21
DEVICE=em1
ONBOOT=yes
IPADDR=10.1.10.183
NETMASK=255.255.255.0

[quantprod@hkoffice083 network-scripts]$ cat ifcfg-em2
TYPE=Ethernet
BOOTPROTO=static
NAME=em2
UUID=8fd78b3f-b8c9-48f1-9740-9d5f9feae4f2
DEVICE=em2
ONBOOT=no
IPADDR=192.168.10.50
NETMASK=255.255.255.0

[quantprod@hkoffice083 ~]$ sudo service ntpd start
Redirecting to /bin/systemctl start  ntpd.service
[quantprod@hkoffice083 ~]$ ntpq -p
     remote           refid      st t when poll reach   delay   offset  jitter
==============================================================================
*218.189.210.4   128.138.140.44   2 u    1   64    1    2.905  -18.203   1.256
 218.189.210.3   128.138.140.44   2 u    2   64    1    3.559  -17.617   0.000

[quantprod@hkoffice083 ~]$ lscpu
Architecture:          x86_64
CPU op-mode(s):        32-bit, 64-bit
Byte Order:            Little Endian
CPU(s):                16
On-line CPU(s) list:   0-15
Thread(s) per core:    2
Core(s) per socket:    4
Socket(s):             2
NUMA node(s):          2
Vendor ID:             GenuineIntel
CPU family:            6
Model:                 26
Model name:            Intel(R) Xeon(R) CPU           E5520  @ 2.27GHz
Stepping:              5
CPU MHz:               2261.120
BogoMIPS:              4521.29
Virtualization:        VT-x
L1d cache:             32K
L1i cache:             32K
L2 cache:              256K
L3 cache:              8192K
NUMA node0 CPU(s):     0,2,4,6,8,10,12,14
NUMA node1 CPU(s):     1,3,5,7,9,11,13,15

[quantprod@hkoffice083 ~]$ df -h
Filesystem      Size  Used Avail Use% Mounted on
/dev/sdd1        50G  1.5G   46G   4% /
devtmpfs         16G     0   16G   0% /dev
tmpfs            16G     0   16G   0% /dev/shm
tmpfs            16G  8.8M   16G   1% /run
tmpfs            16G     0   16G   0% /sys/fs/cgroup
/dev/sdc1       275G  363M  261G   1% /data
/dev/sdd3        54G  179M   51G   1% /usr/local
tmpfs           3.2G     0  3.2G   0% /run/user/1004
tmpfs           3.2G     0  3.2G   0% /run/user/1002

[quantprod@hkoffice083 ~]$ mount
sysfs on /sys type sysfs (rw,nosuid,nodev,noexec,relatime)
proc on /proc type proc (rw,nosuid,nodev,noexec,relatime)
devtmpfs on /dev type devtmpfs (rw,nosuid,size=16374724k,nr_inodes=4093681,mode=755)
securityfs on /sys/kernel/security type securityfs (rw,nosuid,nodev,noexec,relatime)
tmpfs on /dev/shm type tmpfs (rw,nosuid,nodev)
devpts on /dev/pts type devpts (rw,nosuid,noexec,relatime,gid=5,mode=620,ptmxmode=000)
tmpfs on /run type tmpfs (rw,nosuid,nodev,mode=755)
tmpfs on /sys/fs/cgroup type tmpfs (ro,nosuid,nodev,noexec,mode=755)
cgroup on /sys/fs/cgroup/systemd type cgroup (rw,nosuid,nodev,noexec,relatime,xattr,release_agent=/usr/lib/systemd/systemd-cgroups-agent,name=systemd)
pstore on /sys/fs/pstore type pstore (rw,nosuid,nodev,noexec,relatime)
cgroup on /sys/fs/cgroup/cpu,cpuacct type cgroup (rw,nosuid,nodev,noexec,relatime,cpuacct,cpu)
cgroup on /sys/fs/cgroup/memory type cgroup (rw,nosuid,nodev,noexec,relatime,memory)
cgroup on /sys/fs/cgroup/devices type cgroup (rw,nosuid,nodev,noexec,relatime,devices)
cgroup on /sys/fs/cgroup/cpuset type cgroup (rw,nosuid,nodev,noexec,relatime,cpuset)
cgroup on /sys/fs/cgroup/blkio type cgroup (rw,nosuid,nodev,noexec,relatime,blkio)
cgroup on /sys/fs/cgroup/net_cls type cgroup (rw,nosuid,nodev,noexec,relatime,net_cls)
cgroup on /sys/fs/cgroup/perf_event type cgroup (rw,nosuid,nodev,noexec,relatime,perf_event)
cgroup on /sys/fs/cgroup/hugetlb type cgroup (rw,nosuid,nodev,noexec,relatime,hugetlb)
cgroup on /sys/fs/cgroup/freezer type cgroup (rw,nosuid,nodev,noexec,relatime,freezer)
configfs on /sys/kernel/config type configfs (rw,relatime)
/dev/sdd1 on / type ext4 (rw,noatime,data=ordered)
systemd-1 on /proc/sys/fs/binfmt_misc type autofs (rw,relatime,fd=25,pgrp=1,timeout=300,minproto=5,maxproto=5,direct)
hugetlbfs on /dev/hugepages type hugetlbfs (rw,relatime)
mqueue on /dev/mqueue type mqueue (rw,relatime)
debugfs on /sys/kernel/debug type debugfs (rw,relatime)
/dev/sdc1 on /data type ext4 (rw,noatime,data=ordered)
/dev/sdd3 on /usr/local type ext4 (rw,noatime,data=ordered)
tmpfs on /run/user/1004 type tmpfs (rw,nosuid,nodev,relatime,size=3276928k,mode=700,uid=1004,gid=1004)
tmpfs on /run/user/1002 type tmpfs (rw,nosuid,nodev,relatime,size=3276928k,mode=700,uid=1002,gid=1002)
binfmt_misc on /proc/sys/fs/binfmt_misc type binfmt_misc (rw,relatime)

[quantprod@hkoffice083 ~]$ free -g
              total        used        free      shared  buff/cache   available
Mem:             31           0          29           0           0          30
Swap:            31           0          31


[quantprod@hkoffice083 ~]$ cat /proc/version
Linux version 3.10.0-327.22.2.el7.x86_64 (builder@kbuilder.dev.centos.org) (gcc version 4.8.3 20140911 (Red Hat 4.8.3-9) (GCC) ) #1 SMP Thu Jun 23 17:05:11 UTC 2016

[quantprod@hkoffice083 ~]$ cat /etc/*-release
CentOS Linux release 7.2.1511 (Core)
NAME="CentOS Linux"
VERSION="7 (Core)"
ID="centos"
ID_LIKE="rhel fedora"
VERSION_ID="7"
PRETTY_NAME="CentOS Linux 7 (Core)"
ANSI_COLOR="0;31"
CPE_NAME="cpe:/o:centos:centos:7"
HOME_URL="https://www.centos.org/"
BUG_REPORT_URL="https://bugs.centos.org/"

CENTOS_MANTISBT_PROJECT="CentOS-7"
CENTOS_MANTISBT_PROJECT_VERSION="7"
REDHAT_SUPPORT_PRODUCT="centos"
REDHAT_SUPPORT_PRODUCT_VERSION="7"

CentOS Linux release 7.2.1511 (Core)


How to connect to Synology DSM 5 NFS volume from Linux CentOS 7


error encounted
[root@localhost ~]# mount 10.1.10.192:/volume1/share /mnt
mount: wrong fs type, bad option, bad superblock on 10.1.10.192:/volume1/share,
       missing codepage or helper program, or other error
       (for several filesystems (e.g. nfs, cifs) you might
       need a /sbin/mount.<type> helper program)

       In some cases useful info is found in syslog - try
       dmesg | tail or so.

Install suitable tools
sudo yum -y install nfs-utils nfs4-acl-tools portmap

Follow the manual
https://www.synology.com/zh-tw/knowledgebase/DSM/tutorial/File_Sharing/How_to_access_files_on_Synology_NAS_within_the_local_network_NFS

2016年9月1日 星期四

Google 0.3.4 glog on Windows 7


https://github.com/google/glog/archive/master.zip

Sln档案
D:\public\glog-master\google-glog.sln
Microsoft Visual Studio Solution File, Format Version 10.00
# Visual C++ Express 2008


I use Visual Studio 2013. After converted, run batch build to all


先下載glog最新版,解壓裡面有*sln文件,如果你安裝了VS2005以上版本都可以直接打開,編譯即可得到libglog.dll和libglog.lib文件,拷貝文件到你的測試文件夾下,並拷貝src\windows\下的glog目錄到你的工程文件下。

或者可以把整个编译完的glog-master拷到你的工程文件下。
其中某些档案可以删掉不要,Backup,vsprojects\*\Debug, \Release, \*.vcxproj, \*.filters *.suo UpgradeLog.htm,最后剩下21.4 MB (22,452,538 bytes)。


工程文件我新创建solution包含一个project,添加library文件夹在solution下面,把glog放到library里面。


C/C++ > General > Additional Include Directories = ..\library\glog\src\windows\
Linker > General > Additional Library Directories = ..\library\glog\$(Configuration);%(AdditionalLibraryDirectories)
Build Evenets > POst-Build Event > Command Line = xcopy /y /d "..\\library\glog\$(Configuration)\*.dll" "$(OutDir)"

2016年8月10日 星期三

How to install ODBC Driver using ODAC under Windows 7 for connecting a remote Oracle 11g Server, and obtain data from Oracle DB to Microsoft Excel?

How to install ODBC Driver using ODAC under Windows 7 for connecting a remote Oracle 11g Server, and obtain data from Oracle DB to Microsoft Excel?

https://tensix.com/2012/06/setting-up-an-oracle-odbc-driver-and-data-source/

SETTING UP AN ORACLE ODBC DRIVER AND DATA SOURCE

06/15/12
by TheCobraGuy
Setting up an Oracle ODBC Driver and Data Source requires more steps than the Microsoft SQL Server database setup. This article explains the steps including tnsnames.ora configuration.
Connecting to an Oracle database via and ODBC driver requires the following steps:
  1. Install the ODAC (Oracle Data Access Components) or Oracle Client on the Workstation or Application Server.
  2. Setup the SQLNET and TNSNAMES files in the Client or ODAC home’s Admin directory.
  3. Use the ODBC Data Source configuration tools to create the ODBC Data Source.
The following blog shows the process involved for each of these steps to get you a working connection to an Oracle database.
Prerequisites: Java JRE or SDK 6 Update 27 or later. These are required by the Oracle Universal Installer to run the ODAC installation program.

Step 1 – Install the ODAC or Oracle Client

In this example we will be installing the ODAC client to complete an ODBC setup on a Windows 7 (64-bit) operating system.  You can install the full administrative option of the Oracle Client to obtain the ODBC driver.
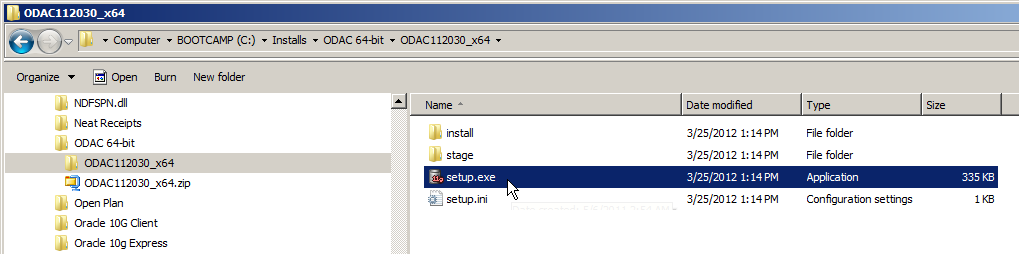
Download the ODAC112030_x64.zip file from Oracle’s web site:
Unzip the file to a location of your choosing.
Locate the Setup.exe file under the root directory of the extracted zip file’s directories.
 
Double-click to run the setup program.
In the ‘Oracle Universal Installer’, click the Next button.
 
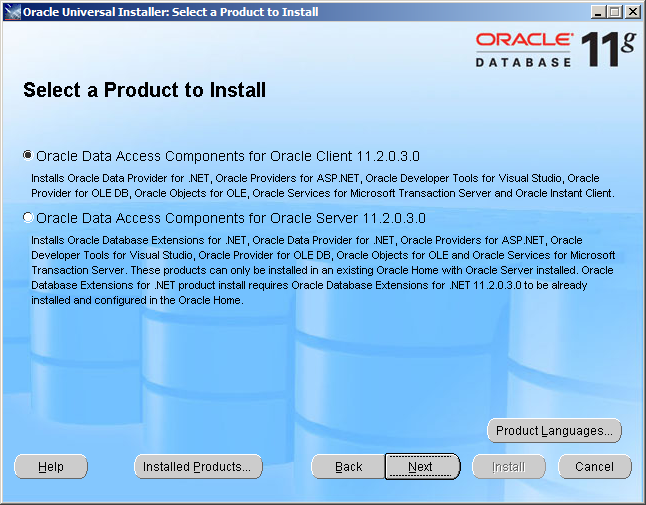
In the ‘Select a Product to Install’ dialog, go with the default ‘Oracle Data Access Components for Oracle Client 11.2.0.3.0’ option.
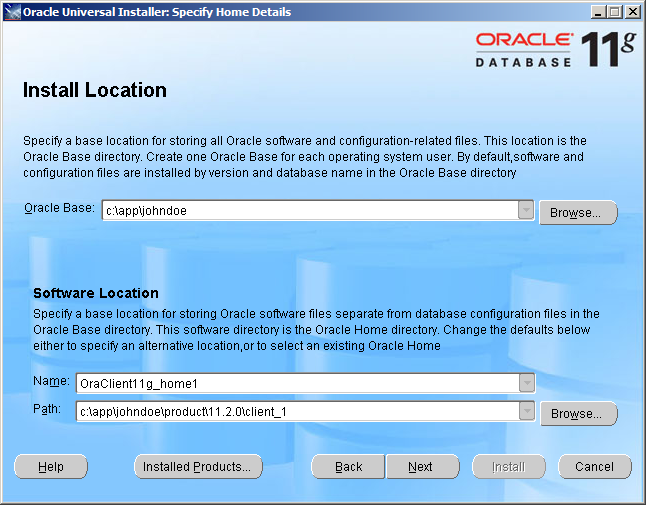
In the ‘Install Location’ dialog, enter a path to install the ODAC home directory to in the ‘Oracle Base:’ field.
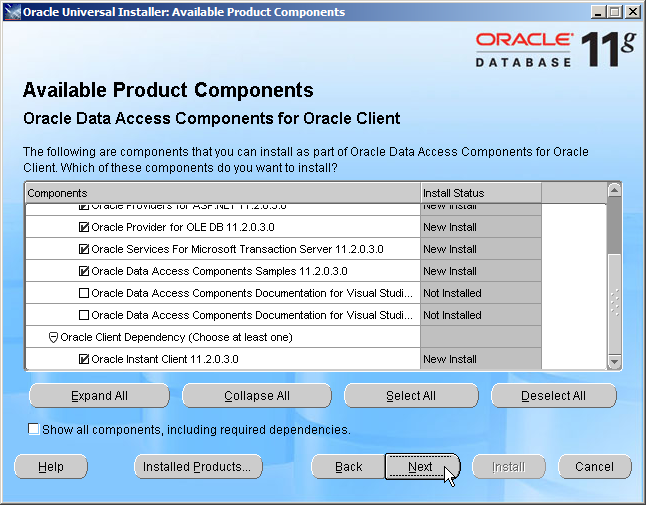
In the ‘Available Product Components’ dialog, go with the default options.
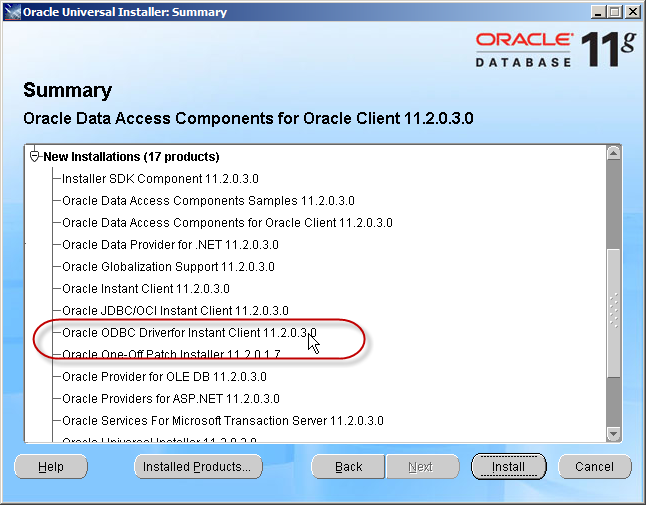
In the ‘Summary’ dialog, verify that the components you have selected for install include the ‘Oracle ODBC Driver for Instant Client 11.2.0.3.0’.
Click ‘Install’.
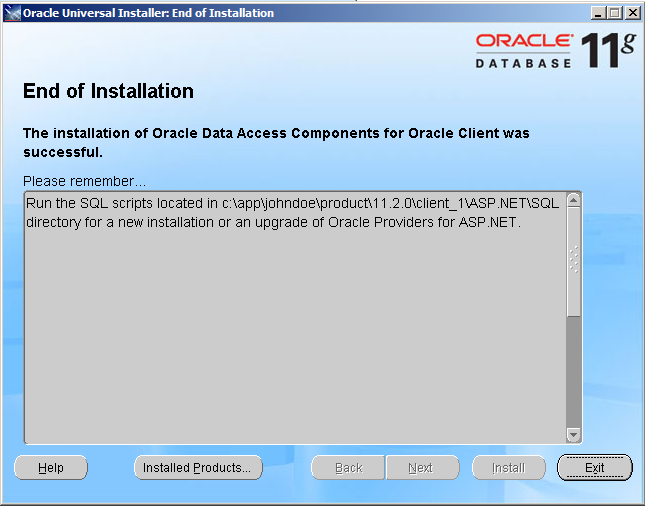
When the installation is complete, click ‘Exit’.
This concludes the steps for installing the ODBC drivers.

Step 2 – Setup the SQLNET and TNSNAMES files

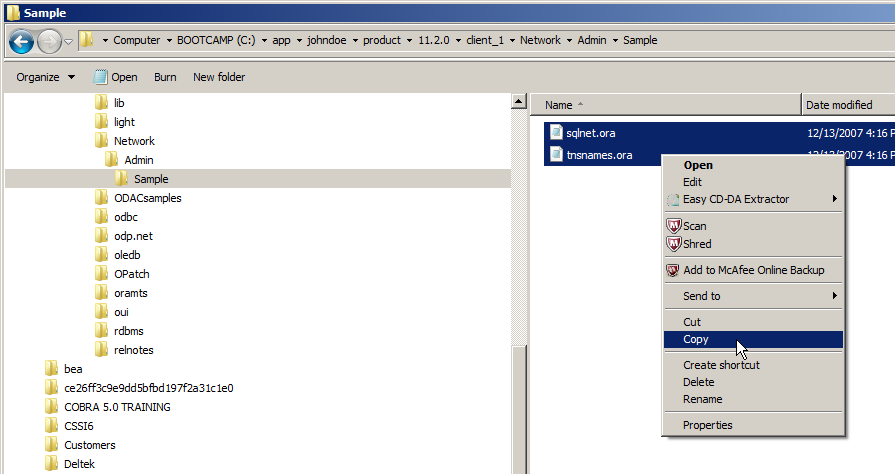
Locate the SQLNET.ora and TNSNAMES.ora in the ‘samples’ directory of the newly installed Oracle client home directory. This is typically:
C:\app\johndoe\product\11.2.0\client_1\Network\Admin\Sample
Where ‘johndoe’ is the windows user name.
Copy these two files into the ‘Admin’ directory above.
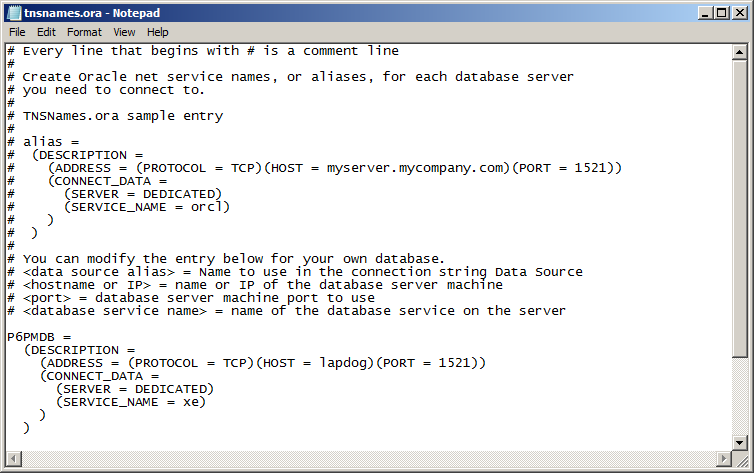
Open the ‘TNSNAMES.ora’ file in Notepad and enter your Oracle database details in the file.
Save your changes.
Note: the ‘SQLNET.ora’ generally doesn’t need to be changed.

Step 3 – Create the ODBC Data Source

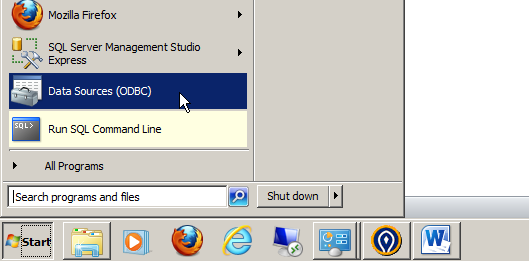
In the Windows Start menu, click on the Data Sources (ODBC) icon that was created by the ODAC client install.
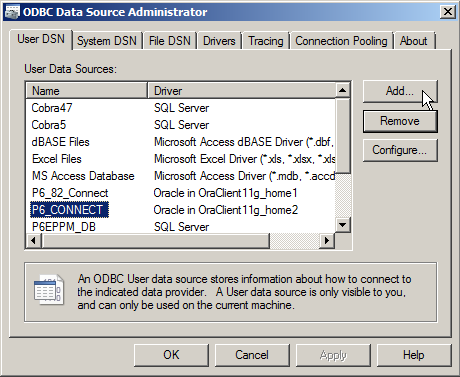
In the ‘User DSN’ tab of the ‘ODBC Data Source Administrator’ dialog, click Add.
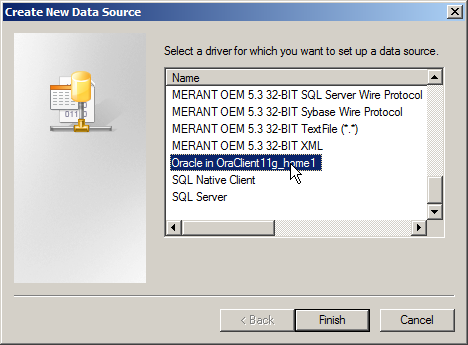
In the ‘Create New Data Source’ dialog, select the ‘Oracle in OraClient 11g_home1’ driver.
Click ‘Finish’.
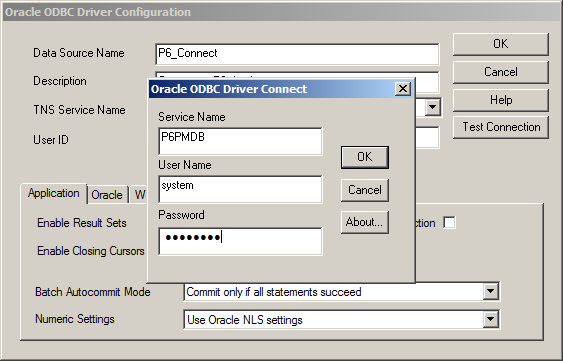
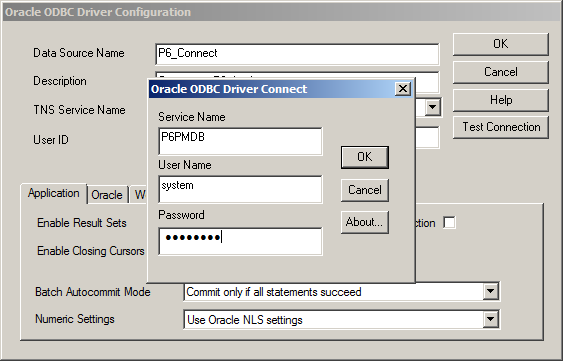
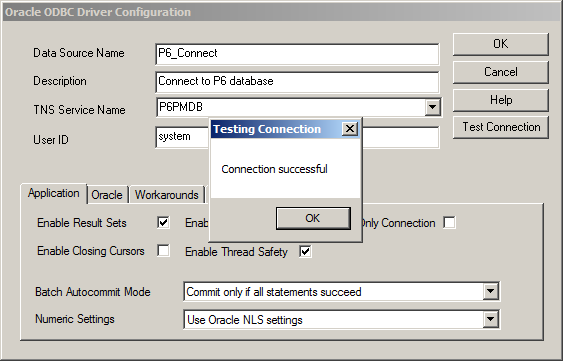
In the ‘Oracle ODBC Driver Configuration’ dialog, enter the details of your data source.
Note: you should be able to select the TNS Service Name from the drop down list. This name will be that which you named in the TNSNAMES.ora file’s Alias = section.
Click ‘Test Connection’ to ensure your settings are all correct.
When prompted, enter the database login credentials.
Click ‘OK’.
 
Click OK to complete the process.


sdfsdf

Synology DSM 5.2 and 6.1 on Virtual Box

Synology DSM 5.2 on Virtual Box


Files

On my Google Drive "2016DSM5.2" or download link below (3 files total: pat, iso, exe)

http://xpenology.me/downloads/

DSM 5.2-5644 DS3615xs
DSM_5.2-5644PATdownload43a3c4a95c95c4fbe7ba0d2f39d60747

Boot Images (based on GNU Open Source)

XPEnoboot DSM 5.2
XPEnoboot 5.2-5644.5 DS3615xs
XPEnoboot DS3615xs5.2-5644.5ISOdownloada92ea8c869c48fc340a91e41a01d4cfd

Tools

Synology Assistant
Synology Assistant 5.2-5005WindowsDownload

OR

https://www.synology.com/en-global/support/download/DS3615xs
Synology Assistant
Windows:


Procedure


Virtualbox New DSM Linux Ubuntu (64-bit) 2GB 1TB
Storage > Controller IDE > XPEnoboot_DS3615xs_5.2-5644.5.iso
Network > Adapter 1 > Attached to: > Bridge Adapter
Install/Upgrade
Synology Assistant > Search

Right click, connect with the browser, manual select the pat file to install.


First login: admin, no password


DSM 6.1 on Virtual Box


Files


Procedure


2007 to 2023 HP and Dell Servers Comparison

  HP Gen5 to Gen11  using ChatGPT HP ProLiant Gen Active Years CPU Socket Popular HP CPUs Cores Base Clock Max RAM Capacity Comparable Dell ...