https://linuxhint.com/install_wireshark_ubuntu/
$ sudo apt update
$ sudo apt install wireshark
$ sudo usermod -aG wireshark $(whoami)
$ wireshark
$ sudo wireshark
https://linuxhint.com/install_wireshark_ubuntu/
$ sudo apt update
$ sudo apt install wireshark
$ sudo usermod -aG wireshark $(whoami)
$ wireshark
$ sudo wireshark
https://www.digitalocean.com/community/tutorials/how-to-install-node-js-on-ubuntu-20-04
sudo apt update
sudo apt install nodejs
nodejs -v # 10.19.0
sudo apt install npm
Yeah!
GitExtension on Ubuntu 20
https://github.com/gitextensions/gitextensions/wiki/How-To:-run-Git-Extensions-on-Linux
sudo apt install git
git --version # 2.25.1
sudo apt install kdiff3
kdiff3 --version # 1.8.1
Mono
sudo apt install gnupg ca-certificates
sudo apt-key adv --keyserver hkp://keyserver.ubuntu.com:80 --recv-keys 3FA7E0328081BFF6A14DA29AA6A19B38D3D831EF
echo "deb https://download.mono-project.com/repo/ubuntu stable-focal main" | sudo tee /etc/apt/sources.list.d/mono-official-stable.list
sudo apt update
sudo apt install mono-devel
sudo apt install mono-complete
mono --version # 6.12.0.122
SSH
apt-get install ssh-clientsudo apt install ksshaskpass
Yeah! Done!
General
sudo apt install hardinfo
lsb_release -a # linux standard base returns 20.04
lspci | grep Realtek
uname -a # 5.8.0 or 5.13
sudo hostname ricky-pc
tool
sudo apt-get install ncdu
# use up down left right q c
ufw
sudo ufw status
# Status: inactive
sudo ufw enable
sudo ufw status
# Status: active
ufw status numbered
ufw delete 1
sudoer
sudo nano /etc/sudoers # or sudo visudo
# add line to bottom, must be after $sudo line
leungric ALL=(ALL:ALL) NOPASSWD:ALL
sudo ls -al /root
# no prompt
ssh
sudo apt install ssh
sudo systemctl enable --now ssh
sudo systemctl status ssh
sudo ufw allow ssh/tcp
rdp (not quite working)
sudo apt-get install -y xrdp
sudo systemctl enable xrdp
vnc (ugly but working)
# https://tecadmin.net/install-vnc-server-on-ubuntu-20-04/
sudo apt install tigervnc-standalone-server -y
vncpasswd
# enter 8 char pw
vncserver -localhost no
# New '1037u:1 (leungric)' desktop at :1 on machine 1037u
# Starting applications specified in /home/leungric/.vnc/xstartup
# Log file is /home/leungric/.vnc/1037u:1.log
# Use xtigervncviewer -SecurityTypes VncAuth,TLSVnc -passwd /home/leungric/.vnc/passwd 1037u:1 to connect to the VNC server.
vncserver -list
# X DISPLAY #RFB PORT #PROCESS ID
# :1 5901 2141
sudo ufw allow 5901/tcp
sudo ufw status
# 5901/tcp ALLOW anywhere
# Windows TightVNC Viewer 192.168.1.103:1
# guacamole 192.168.1.103 5901 can work
vnc "authentucation is required to create a color profile" (working in 2022)
# https://devanswers.co/how-to-fix-authentication-is-required-to-create-a-color-profile-managed-device-on-ubuntu-20-04-20-10/
vnc, CTRL ALT T, nautilus
sudo nano /etc/polkit-1/localauthority.conf.d/02-allow-colord.conf
polkit.addRule(function(action, subject) {
 if ((action.id == "org.freedesktop.color-manager.create-device" ||
 action.id == "org.freedesktop.color-manager.create-profile" ||
 action.id == "org.freedesktop.color-manager.delete-device" ||
 action.id == "org.freedesktop.color-manager.delete-profile" ||
 action.id == "org.freedesktop.color-manager.modify-device" ||
 action.id == "org.freedesktop.color-manager.modify-profile") &&
 subject.isInGroup("{users}")) {
 return polkit.Result.YES;
 }
});
sudo reboot
vncserver -kill :2
vncserver -localhost no
vnc-server -list
# Windows 10 TightVNC Viewer 192.168.1.103:3
# a working xfce4 xstartup
cat xstartup.working.xfce
#!/bin/sh
xrdb $HOME/.Xresources
xsetroot -solid grey
#x-terminal-emulator -geometry 80x24+10+10 -ls -title "$VNCDESKTOP Desktop" &
#x-window-manager &
# Fix to make GNOME work
export XKL_XMODMAP_DISABLE=1
/etc/X11/Xsession
startxfce4 &
vnc service (seems better)
# https://www.digitalocean.com/community/tutorials/how-to-install-and-configure-vnc-on-ubuntu-20-04
Python
sudo apt install python3-distutils
sudo apt install python3-apt
sudo apt install python3-pip
sudo apt install python-is-python3
Office
sudo apt install thunderbird
sudo apt install openvpn unzip network-manager-openvpn
sudo apt install vim
Chrome
wget https://dl.google.com/linux/direct/google-chrome-stable_current_amd64.deb
sudo apt install ./google-chrome-stable_current_amd64.deb
wget -O- https://updates.signal.org/desktop/apt/keys.asc | gpg --dearmor > signal-desktop-keyring.gpg
cat signal-desktop-keyring.gpg | sudo tee -a /usr/share/keyrings/signal-desktop-keyring.gpg > /dev/null
echo 'deb [arch=amd64 signed-by=/usr/share/keyrings/signal-desktop-keyring.gpg] https://updates.signal.org/desktop/apt xenial main' |\
sudo tee -a /etc/apt/sources.list.d/signal-xenial.list
sudo apt update && sudo apt install signal-desktop
C++
sudo apt install make
sudo apt install gcc
sudo snap install netbeans --classic
Java Eclipse
sudo apt update
sudo apt install default-jre
sudo snap install --classic eclipse
Wireshark
sudo apt install wireshark
Editors
sudo apt install ghex
# sublime, vscode, notepad++(ugly)
https://askubuntu.com/questions/1259947/cant-get-rtl8125b-working-on-20-04
lspci -knn | grep Realtek
06:00.0 Ethernet controller [0200]: Realtek Semiconductor Co., Ltd. RTL8125 2.5GbE Controller [10ec:8125] (rev 04)
$ lsb_release -a
No LSB modules are available.
Distributor ID: Ubuntu
Description: Ubuntu 20.04.2 LTS
Release: 20.04
Codename: focal
Here's a solution I found;
Go to the Realtek website 992
Download the Unix(Linux) r8125 driver. You will need to give an email address.
1754×445
Go to /Downloads directory. Extract the Tarball.
In Terminal, go into r8125-xxxx folder and run the autorun.sh
$ sudo ./autorun.sh
Everything should run automatically and you should get ethernet connection now.
$ sudo ./autorun.sh
Check old driver and unload it.
rmmod r8125
Build the module and install
At main.c:160:
- SSL error:02001002:system library:fopen:No such file or directory: ../crypto/bio/bss_file.c:69
- SSL error:2006D080:BIO routines:BIO_new_file:no such file: ../crypto/bio/bss_file.c:76
sign-file: certs/signing_key.pem: No such file or directory
Warning: modules_install: missing 'System.map' file. Skipping depmod.
DEPMOD 5.8.0-43-generic
load module r8125
Updating initramfs. Please wait.
update-initramfs: Generating /boot/initrd.img-5.8.0-43-generic
Completed.
ip link
sudo ip link set enp6s0 up


https://www.thepythoncode.com/article/automate-login-to-websites-using-selenium-in-python
https://www.thepythoncode.com/article/extracting-and-submitting-web-page-forms-in-python
Learn how to use Selenium library with Chrome driver in Python to login to websites automatically as well as verifying login success.
Controlling a web browser from a program can be useful in many scenarios, example use cases are website text automation and web scraping, a very popular framework for this kind of automation is Selenium WebDriver.
Selenium WebDriver is a browser-controlling library, it supports all major browsers (Firefox, Edge, Chrome, Safari, Opera, etc.) and is available for different programming languages including Python. In this tutorial, we will be using its Python bindings to automate login to websites.
Automating the login process to a website proves to be handy. For example, you may want to edit your account settings automatically, or you want to extract some information that requires login, etc.
We have a tutorial on extracting web forms using BeautifulSoup library, so you may want to combine extracting login forms and filling them with the help of this tutorial.
First, let's install Selenium for Python:
The next step is installing the driver specific to the browser we want to control, download links are available on this page. I'm installing ChromeDriver, but you're free to use your favorite.
To make things concrete, I'll be using Github login page to demonstrate on how you can automatically login using Selenium.
Open up a new Python script and initialize the WebDriver:
After you downloaded and unzipped the driver for your OS, put it in your current directory or in a known path, so you can pass it to webdriver.Chrome() class. In my case, chromedriver.exe is in the current directory, so I simply pass its name to the constructor.
Since we're interested in automating Github login, we'll navigate to Github login page and we inspect the page to identify its HTML elements:
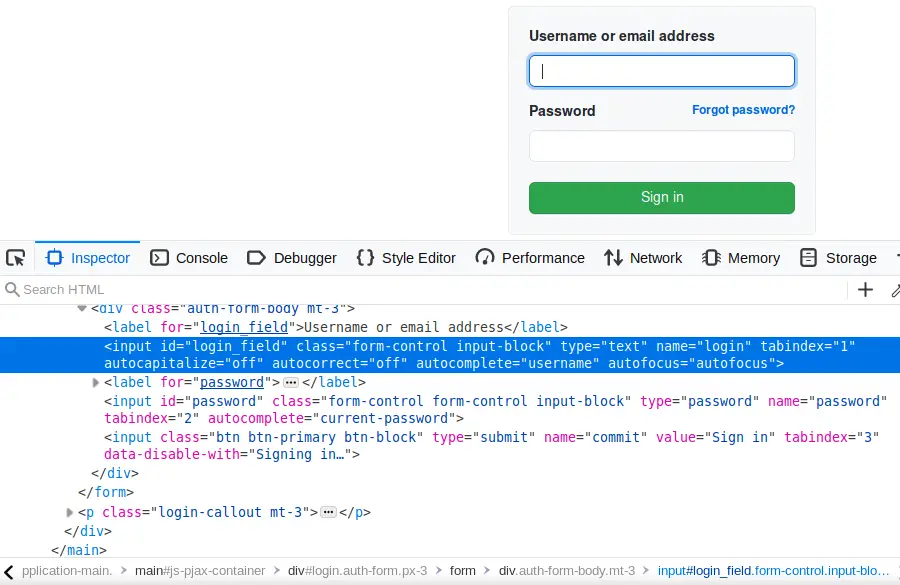 The
The id of the login and password input fields, and the name of the Sign in button will be useful for us to retrieve these elements in code and insert to it programmatically.
Notice the username/email address input field has login_field id, where the password input field has the id of password, see also the submit button has the name of commit, the below code goes to Github login page, extracts these elements, fills the credentials and clicks the button:
The find_element_by_id() function retrieves an HTML element by its id, and the send_keys() method simulates keypresses, the above code cell will make Chrome type in the email and the password, and then click the Sign in button.
The next thing to do is to determine whether our login was successful, there are a lot of ways to detect that, but in this tutorial, we'll do it by detecting the shown errors upon login (of course, this will change from a website to another).
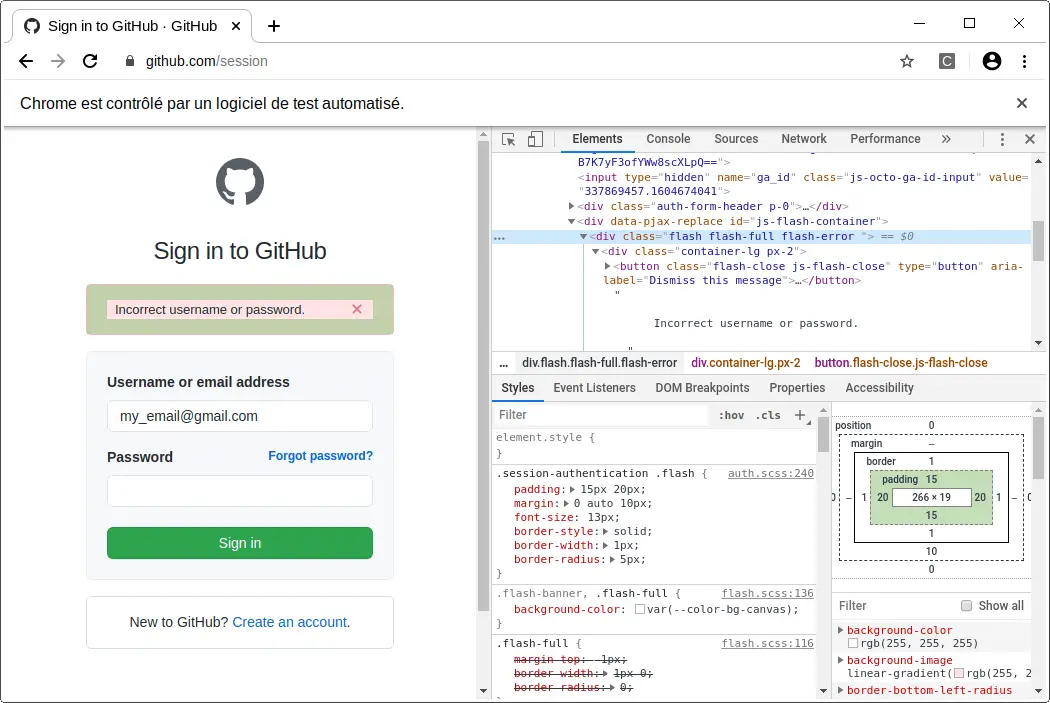 The above image shows what happens when we insert wrong credentials, you'll see a new HTML
 div element with the class "flash-error" that has the text of "Incorrect username or password.".
The below code is responsible for waiting for the page to be loaded after the login is performed using WebDriverWait(), and checks for the error:
We use WebDriverWait to wait until the document finished loading, the execute_script() method executes Javascript in the context of the browser, the JS code return document.readyState === 'complete' returns True when the page is loaded, and False otherwise.
Finally, we close our driver:
Alright, now you have the skill to login automatically to the website of your choice, note that Github will block you when you run the script multiple times with wrong credentials, so be aware of that.
Now you can do the thing you want to do after you login using your account, you can add the code in the line where we're printing 'Login successful'.
Also, if you've successfully logged in using your real account, you may encounter email confirmation, to bypass that, you have to read your email programmatically with Python and extracts the confirmation code and insert it in real time using Selenium, great challenge, isn't it ? Good luck on it!
Note that login process will differ from website to another, the goal of this tutorial is to give you the essential skills to automate the login of your target website.
End
