2017年8月31日 星期四

INSTALL GUACAMOLE ON CENTOS 7 & 6 (THE SUPER EASY WAY)

Install guacamole
yum install -y wget
wget http://sourceforge.net/projects/guacamoleinstallscript/files/CentOS/guacamole-install-script.sh
sudo chmod +x guacamole-install-script.sh
sudo ./guacamole-install-script.sh

Use guacamole
http://IP-of-your-CentOS-VM:8080/guacamole/
https://IP-of-your-CentOS-VM:8443/guacamole/
Default username and password is guacadmin
Login and press Ctrl+Alt+Shift at least twice to feel it
Create a new user leungric and allow following
Create new connections
Create new connection groups
Create new sharing profiles
Change own password


https://thatservernerd.com/2016/02/25/install-guacamole-on-centos-76-the-super-easy-way/


If you haven’t checked out Guacamole, you seriously need to, but if you’ve been homelabbing for awhile then you’ve probably at least heard of it. Guacamole is an open-source HTML5-based clientless remote desktop gateway, allowing you to remotely connect to your devices via a simple webpage. It works with RDP, SSH, Telnet (but please use SSH instead if you can, guys), and VNC, and it is one of my absolute favorite tools.
I will admit that it’s not uncommon for me to create a new Linux server VM, install something pretty cool, say “This is pretty cool!”, and then never use that VM ever again. But Guacamole is the one that I show off to everyone because of how convenient it is and how well it works. Even if who I’m showing it off to isn’t into homelabs, system administration, or Linux, they always seem to think Guacamole is great. But the one thing that stops a lot of people from using it is the install process (though you can now easily deploy it in Docker).
Well thanks to this handy script, that’s no longer the case. I’ve installed Guacamole on Ubuntu and CentOS but I figured some people that might be reading this aren’t familiar with any Linux distro or Docker, so I wanted to find the simplest way possible to install Guacamole for someone that might be new to both.
What I found was this awesome script written by Hernan that was posted on his Sourceforge page. Here’s a description of the script according to his page:
“The script installs dependencies and configure the OS automatically for you in order to obtain the best Remote Desktop Gateway!
This Install Script works in a clean CentOS 6/7 installation and install Guacamole 0.9.9 version for a local users authentication.
Task of this script:
  • Install Packages Dependencies
  • Download Guacamole and MySQL Connector packages
  • Install Guacamole Server
  • Install Guacamole Client
  • Install MySQL Connector
  • Configure MariaDB or MySQL
  • Configure FirewallD or iptables
  • Setting Tomcat Server
  • Generates a Java KeyStore for SSL Support.”
I’ve tested out his script and it works perfectly. It makes it extremely easy for even the biggest Linux noobs to get Guacamole working on CentOS 7 or 6. If you want to use Guacamole in your homelab environment, here are the steps to get it going using Hernan’s script (assuming you have a fresh minimal install of CentOS ready to go).
**Update 3/30/16**
I updated this tutorial to use Hernan’s latest script. This adds the option to install Nginx as a proxy for Guacamole during the wizard.
How to install Guacamole on CentOS 7/6 the super easy way
1. (Assuming you’re logged in as root), type in the following to install Wget:
yum install -y wget
2. Let’s download the script using wget:
wget http://sourceforge.net/projects/guacamoleinstallscript/files/CentOS/guacamole-install-script.sh
3. Now let’s make sure we can execute the script:
chmod +x guacamole-install-script.sh
4. Execute!
./guacamole-install-script.sh
5. The script is going to take awhile to run while it downloads and installs everything that needs to download and install. Once it’s done, you’ll see the below screenshot asking you to create a root password for MariaDB, the Guac DB name, username, and password, then finally the Java KeyStore password. Don’t use the ones I used and don’t forget what they are.
2
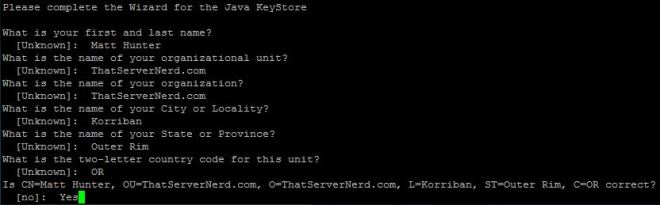
6. Once at the wizard for the Java KeyStore, go ahead and fill out your information.
3
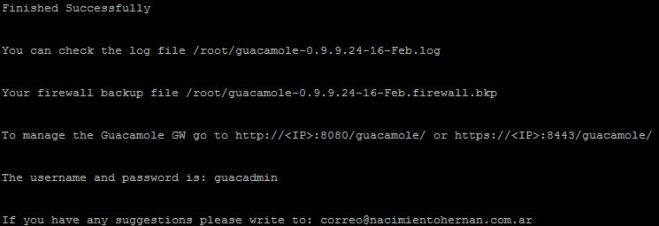
7. Once you see the screenshot below, you’ve officially installed Guacamole! All that’s left is to go to the page at http://IP-of-your-CentOS-VM:8080/guacamole/ or https://IP-of-your-CentOS-VM:8443/guacamole/ and start adding some remote connections. Default username and password is guacadmin.
35

Adding your first connections in Guacamole
Adding remote connections is pretty self-explanatory, but you can follow my instructions below if you’d like some guidance. The examples I’ve added below are a Windows 10 workstation using RDP and an HP Procurve (err I mean Aruba or whatever HP is calling their product this week) switch of mine using SSH.
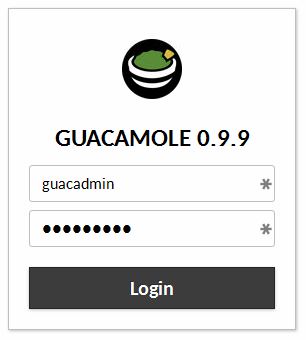
1. Once you go to your Guacamole web UI, you’ll see the screenshot below. Go ahead and login with the default username and password guacadmin (don’t forget to change the default password).
4
2. (Optional) I suggest creating your own user account outside of guacadmin (after changing the default password). Click on the guacadmin dropdown menu in the upper right and then Settings. Go to Users, New User, and fill out the Username & Password fields. For my account, I also checked all the permissions except “Administer system” and “Create new users” (I leave that up for the guacadmin account). Now log out of guacadmin and log into your new account.
3. Click on the username dropdown menu in the upper right and then Settings. Under the Connections tab, click New Connection.
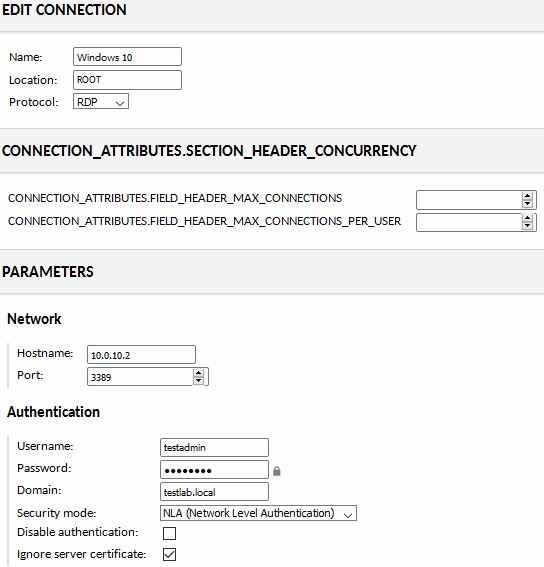
4. For a Windows machine, let’s create an RDP connection. The screenshot below is a working configuration for my Windows 10 workstation. Under Authentication, you might have to experiment with different “Security modes” and maybe check “Ignore server certificate to get it properly connecting.
6
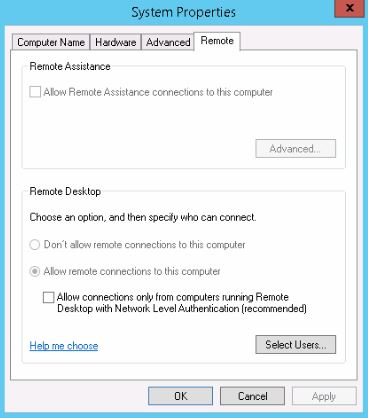
NOTE: If you’re having trouble getting it to connect after experimenting with the Security modes, you can try unchecking “Allow connections only from computers running Remote Desktop with Network Level Authentication” in Windows’s System Properties (shown below), then clearing “Security mode” and “Ignore server certificate” in the Connection settings in Guacamole.
65
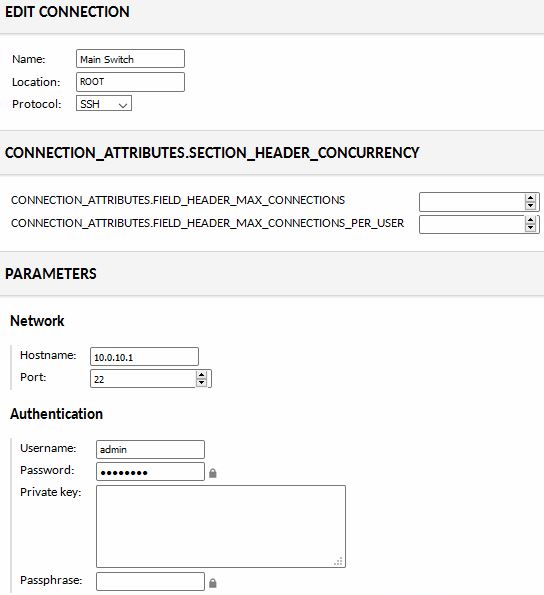
5. Let’s add a remote connection using SSH (like a Linux machine, networking device, etc.). Below is the working Connection settings for my main switch.
7
6. Once you’ve got an RDP and an SSH connection saved, let’s go to the homepage (username dropdown menu then Home). Now click on any of the connections you just created. Below are screenshots of both my Windows workstation and main switch remoted into.
Congrats! You now have a fully functional Guacamole server! If you followed the steps on adding some remote connections, you should now be able to see how well remoting into your devices works in any browser using HTML5. Using that script, even the noobiest(?) of Linux noobs can get a Guacamole server up and running in no time and with minimal effort.
I just wanted to thank Hernan for letting me post his script. If you’d like to check out his blog, you can do so by clicking here.

2017年8月21日 星期一

Raspberry Pi 3 Installation Guide ARM Java Firefox Wifi Minoconda Python

CentOS-Userland-7-armv7hl-Minimal-1611-RaspberryPi3.img.xz 2016-12-09 10:12 312M
Win32 Disk Imager

put card to rpi3 connecting to router
router check rpi3 ip address

connect to rpi3
ssh root@192.168.31.90
centos
yum -y update

check disk space only has 2GB
fdisk -l
df -h

roots-expand
/usr/local/bin/rootfs-expand

install wifi
curl --location https://github.com/RPi-Distro/firmware-nonfree/raw/master/brcm80211/brcm/brcmfmac43430-sdio.bin> /usr/lib/firmware/brcm/brcmfmac43430-sdio.bin
curl --location https://github.com/RPi-Distro/firmware-nonfree/raw/master/brcm80211/brcm/brcmfmac43430-sdio.txt > /usr/lib/firmware/brcm/brcmfmac43430-sdio.txt
systemctl reboot
ip addr | grep wlan

ntp
yum -y install ntp
timedatectl set-ntp yes

set time zone
timedatectl list-timezones | grep "Asia"
timedatectl set-timezone "Asia/Hong_Kong"

set locale
localectl list-locales | grep "en"
localectl set-locale LANG="en_US.UTF-8" LC_CTYPE="en_US"
localectl

set autocomplete
yum install -y bash-completion

setup wifi
ip addr show
nmcli connection show
nmtui
activate using device "wlan0"

install jdk 8
wget --no-check-certificate --no-cookies --header "Cookie: oraclelicense=accept-securebackup-cookie" http://download.oracle.com/otn-pub/java/jdk/8u144-b01/090f390dda5b47b9b721c7dfaa008135/jdk-8u144-linux-arm32-vfp-hflt.tar.gz
tar -zxvf jdk-8u144-linux-arm32-vfp-hflt.tar.gz -C /usr/local/java
export JAVA_HOME=/usr/local/java export PATH=$JAVA_HOME/bin:$PATH
sudo vi /etc/profile.d/java.sh
export JAVA_HOME=/usr/local/java/jdk1.8.0_144
export PATH=$JAVA_HOME/bin:$PATH
java -verson

Minoconda Python 2.7.5
wget https://repo.continuum.io/miniconda/Miniconda-latest-Linux-armv7l.sh
chmod +x Miniconda-latest-Linux-armv7l.sh
./Miniconda-latest-Linux-armv7l.sh
ctrl+F, yes
/home/leungric/miniconda
sudo nano ~/.bashrc
# added by Miniconda 3.16.0 installer
export PATH="/home/leungric/miniconda/bin:$PATH"
python --version
conda install anaconda-client
asd

install firefox
sudo yum install bzip2
cd /usr/local
wget http://ftp.mozilla.org/pub/firefox/releases/55.0/linux-x86_64/en-US/firefox-55.0.tar.bz2
tar xvjf firefox-55.0.tar.bz2

2017年8月19日 星期六

樹莓派 3(Raspberry Pi 3) CentOS 7 ARM 安裝與配置


http://www.smalljacky.com/linux/centos/raspberry-pi-3-centos7-arm-install-setup/


樹莓派 3(Raspberry Pi 3) CentOS 7 ARM 安裝與配置


終於可以在「樹莓派 3」上使用 CentOS 了。本篇文章將詳細說明如何在「樹莓派 3」安裝 CentOS 7 ARM 系統,與首次使用的一些設定,如系統更新、自動調整分割區容量、驅動 wifi、時區設定、語系設定...

下載與燒錄映像檔

至 CentOS 官網下載連結 下載「樹莓派 3」的壓縮檔版本(支援樹莓派 2、樹莓派 3)。

先將壓縮檔裡的 .img(映像檔)解壓縮,並參考 Win32 Disk Imager 備份與燒錄 SD 卡 這篇文章將檔案燒錄至「Micro SD 記憶卡」,燒錄完成後:
  1. 將「Micro SD 記憶卡」插入「樹莓派 3」
  2. 接上網路線(網路設備必須支援 DHCP,且須與電腦同一網段)
  3. 「樹莓派 3」開機
接著進入網路設備查看「CentOS 7 ARM」DHCP 分配的網址(或使用網路網段掃描軟體,如 SoftPerfect Network Scanner)。

連結 CentOS 7 ARM

開啟 PieTTY 軟體 > [主機名稱或IP位址(N)] 輸入 IP > [Port] SSH 預設為 22 Port > 點擊 [連線]。
 PieTTY 軟體,可至 PieTTY (pputty) 下載

第一次使用 SSH 連線的主機,會提示是否儲存憑證,點擊 [是(Y)] 即可。

登入「CentOS 7 ARM」預設的帳戶:
  • 帳戶:root
  • 密碼:centos
login as: root
root@192.168.0.156's password: ******
[root@centos-rpi3 ~]#

CentOS 7 ARM 初始設置

系統更新

先更新所有套件、軟體與核心:
 100 多個更新,約 10 幾分才完成…
[root@centos-rpi3 ~]# yum -y update

CentOS 7 ARM README(說明文件)

在 root 家目錄下有一個 README 檔案:
[root@centos-rpi3 ~]# ll
total 4
-rw-r--r--. 1 root root 548 Dec  5 16:28 README
查看該檔案,說明使用「樹莓派 3」要做的兩件事:
  • 自動調整分割區容量
  • 驅動「樹莓派 3」的 wifi
[root@centos-rpi3 ~]# cat README
== CentOS 7 userland ==

If you want to automatically resize your / partition, just type the following (as root user):
/usr/local/bin/rootfs-expand

For wifi on the rpi3, just proceed with those steps :

curl --location https://github.com/RPi-Distro/firmware-nonfree/raw/master/brcm80211/brcm/brcmfmac43430-sdio.bin > /usr/lib/firmware/brcm/brcmfmac43430-sdio.bin

curl --location https://github.com/RPi-Distro/firmware-nonfree/raw/master/brcm80211/brcm/brcmfmac43430-sdio.txt > /usr/lib/firmware/brcm/brcmfmac43430-sdio.txt

systemctl reboot

自動調整分割區容量

先查看目前的容量:
[root@centos-rpi3 ~]# fdisk -l

Disk /dev/mmcblk0: 15.9 GB, 15931539456 bytes, 31116288 sectors
Units = sectors of 1 * 512 = 512 bytes
Sector size (logical/physical): 512 bytes / 512 bytes
I/O size (minimum/optimal): 512 bytes / 512 bytes
Disk label type: dos
Disk identifier: 0x0006dc70

        Device Boot      Start         End      Blocks   Id  System
/dev/mmcblk0p1            2048     1026047      512000    c  W95 FAT32 (LBA)
/dev/mmcblk0p2         1026048     2074623      524288   82  Linux swap / Solaris
/dev/mmcblk0p3         2074624     6268927     2097152   83  Linux

[root@centos-rpi3 ~]# df -h
Filesystem      Size  Used Avail Use% Mounted on
/dev/root       2.0G  995M  839M  55% /
devtmpfs        459M     0  459M   0% /dev
tmpfs           463M     0  463M   0% /dev/shm
tmpfs           463M   12M  451M   3% /run
tmpfs           463M     0  463M   0% /sys/fs/cgroup
/dev/mmcblk0p1  500M   49M  452M  10% /boot
tmpfs            93M     0   93M   0% /run/user/0
 
依 README 執行如下指令,來自動調整分區容量:
[root@centos-rpi3 ~]# /usr/local/bin/rootfs-expand
查看調整後的容量,增加了不少:
[root@centos-rpi3 ~]# fdisk -l

Disk /dev/mmcblk0: 15.9 GB, 15931539456 bytes, 31116288 sectors
Units = sectors of 1 * 512 = 512 bytes
Sector size (logical/physical): 512 bytes / 512 bytes
I/O size (minimum/optimal): 512 bytes / 512 bytes
Disk label type: dos
Disk identifier: 0x0006dc70

        Device Boot      Start         End      Blocks   Id  System
/dev/mmcblk0p1            2048     1026047      512000    c  W95 FAT32 (LBA)
/dev/mmcblk0p2         1026048     2074623      524288   82  Linux swap / Solaris
/dev/mmcblk0p3         2074624    31116287    14520832   83  Linux

[root@centos-rpi3 ~]# df -h
Filesystem      Size  Used Avail Use% Mounted on
/dev/root        14G  999M   13G   8% /
devtmpfs        459M     0  459M   0% /dev
tmpfs           463M     0  463M   0% /dev/shm
tmpfs           463M   12M  451M   3% /run
tmpfs           463M     0  463M   0% /sys/fs/cgroup
/dev/mmcblk0p1  500M   49M  452M  10% /boot
tmpfs            93M     0   93M   0% /run/user/0

驅動「樹莓派 3」的 wifi

查看目前啟用的網路介面只有一個 eth0 有線網路裝置,wifi 並沒有驅動:
[root@centos-rpi3 ~]# ip addr show
1: lo: <LOOPBACK,UP,LOWER_UP> mtu 65536 qdisc noqueue state UNKNOWN qlen 1
    link/loopback 00:00:00:00:00:00 brd 00:00:00:00:00:00
    inet 127.0.0.1/8 scope host lo
       valid_lft forever preferred_lft forever
    inet6 ::1/128 scope host
       valid_lft forever preferred_lft forever
2: eth0: <BROADCAST,MULTICAST,UP,LOWER_UP> mtu 1500 qdisc pfifo_fast state UP qlen 100                                                                                  0
    link/ether b8:27:eb:04:29:8a brd ff:ff:ff:ff:ff:ff
    inet 192.168.0.156/24 brd 192.168.0.255 scope global dynamic eth0
       valid_lft 6580sec preferred_lft 6580sec
    inet6 fe80::ba27:ebff:fe04:298a/64 scope link
       valid_lft forever preferred_lft forever 
依 README 執行如下指令,來安裝 wifi 的驅動:
[root@centos-rpi3 ~]# curl --location https://github.com/RPi-Distro/firmware-nonfree/raw/master/brcm80211/brcm/brcmfmac43430-sdio.bin> /usr/lib/firmware/brcm/brcmfmac43430-sdio.bin
  % Total    % Received % Xferd  Average Speed   Time    Time     Time  Current
                                 Dload  Upload   Total   Spent    Left  Speed
100   172  100   172    0     0     84      0  0:00:02  0:00:02 --:--:--    84
100  360k  100  360k    0     0  87259      0  0:00:04  0:00:04 --:--:--  170k

[root@centos-rpi3 ~]# curl --location https://github.com/RPi-Distro/firmware-nonfree/raw/master/brcm80211/brcm/brcmfmac43430-sdio.txt > /usr/lib/firmware/brcm/brcmfmac43430-sdio.txt
  % Total    % Received % Xferd  Average Speed   Time    Time     Time  Current
                                 Dload  Upload   Total   Spent    Left  Speed
100   172  100   172    0     0     92      0  0:00:01  0:00:01 --:--:--    92
100  1108  100  1108    0     0    388      0  0:00:02  0:00:02 --:--:--  1631
重啟系統:
[root@centos-rpi3 ~]# systemctl reboot
再查看目前啟用的網路介面多了一個 wlan0,也就是 Wireless Lan:
[root@centos-rpi3 ~]# ip addr show
1: lo: <LOOPBACK,UP,LOWER_UP> mtu 65536 qdisc noqueue state UNKNOWN qlen 1
    link/loopback 00:00:00:00:00:00 brd 00:00:00:00:00:00
    inet 127.0.0.1/8 scope host lo
       valid_lft forever preferred_lft forever
    inet6 ::1/128 scope host
       valid_lft forever preferred_lft forever
2: eth0: <BROADCAST,MULTICAST,UP,LOWER_UP> mtu 1500 qdisc pfifo_fast state UP qlen 1000
    link/ether b8:27:eb:04:29:8a brd ff:ff:ff:ff:ff:ff
    inet 192.168.0.156/24 brd 192.168.0.255 scope global dynamic eth0
       valid_lft 6107sec preferred_lft 6107sec
    inet6 fe80::ba27:ebff:fe04:298a/64 scope link
       valid_lft forever preferred_lft forever
3: wlan0:  mtu 1500 qdisc pfifo_fast state DOWN qlen 1000
    link/ether 7a:d5:ba:e9:57:fb brd ff:ff:ff:ff:ff:ff

時區設定

查看目前系統的預設時區為 UTC,會比我們台灣的時間快 4 小時:
[root@centos-rpi3 ~]# timedatectl
      Local time: 六 2017-03-25 12:11:17 UTC
  Universal time: 六 2017-03-25 12:11:17 UTC
        RTC time: n/a
       Time zone: UTC (UTC, +0000)
     NTP enabled: yes
NTP synchronized: yes
 RTC in local TZ: no
      DST active: n/a
先查看與“Asia”相關的時區有哪些:
[root@centos-rpi3 ~]# timedatectl list-timezones | grep "Asia"
... 以上省略 ...
Asia/Srednekolymsk
Asia/Taipei
Asia/Tashkent
... 以下省略 ...
設定時區,並查看:
[root@centos-rpi3 ~]# timedatectl set-timezone "Asia/Taipei"
[root@centos-rpi3 ~]# timedatectl
      Local time: 六 2017-03-25 20:19:23 CST
  Universal time: 六 2017-03-25 12:19:23 UTC
        RTC time: n/a
       Time zone: Asia/Taipei (CST, +0800)
     NTP enabled: yes
NTP synchronized: yes
 RTC in local TZ: no
      DST active: n/a 

語系設定

查看目前設定的語系,可以看到「CentOS 7 ARM」並沒有指定語系:
[root@centos-rpi3 ~]# localectl
   System Locale: n/a

       VC Keymap: n/a
      X11 Layout: n/a
查看所有支援的語系:
[root@centos-rpi3 ~]# localectl list-locales
or 查看與“TW”相關的語系:
[root@centos-rpi3 ~]# localectl list-locales | grep "TW"
nan_TW.utf8@latin
nan_TW@latin
zh_TW
zh_TW.big5
zh_TW.euctw
zh_TW.utf8
設定台灣使用的“zh_TW.utf8”語系,並查看:
[root@centos-rpi3 ~]# localectl set-locale LANG=zh_TW.utf8
[root@centos-rpi3 ~]# localectl
   System Locale: LANG=zh_TW.utf8
       VC Keymap: n/a
      X11 Layout: n/a
重啟系統:
[root@centos-rpi3 ~]# systemctl reboot

其它

自動帶出相關指令;直接完成指令

在命令列輸入指令開頭 1 或多個字母後 [TAB][TAB] 鍵即可:
  • 自動帶出相關指令:有匹配多個
  • 直接完成:匹配一個
先安裝相關套件:
[root@centos-rpi3 ~]# yum install -y bash-completion
登出並重新登入後測試:
[root@centos-rpi3 ~]# logout
login as: root
root@192.168.0.156's password: ******
[root@centos-rpi3 ~]# systemctl res[TAB][TAB]
rescue        reset-failed  restart

2017年8月9日 星期三

How To Install MySQL on CentOS 7 Note

MYSQL

  • wget https://dev.mysql.com/get/mysql57-community-release-el7-11.noarch.rpm
  • md5sum mysql57-community-release-el7-11.noarch.rpm
  • sudo rpm -ivh mysql57-community-release-el7-11.noarch.rpm
  • sudo yum install mysql-server
  • sudo systemctl start mysqld
  • sudo systemctl status mysqld
  • sudo grep 'temporary password' /var/log/mysqld.log
  • echo 'KddRfttC3o,p'
  • sudo mysql_secure_installation
  • <enter new password>
  • no
  • y
  • y
  • y
  • y
  • y

  • mysqladmin -u root -p version
  • mysql -u root -p
  • create user 'deltaone'@'localhost' identified by 'D3lt@0n3';
  • show databases;
  • grant all privileges on *.* to 'deltaone'@'%' identified by 'D3lt@0n3' with grant option;
  • mysql -u deltaone -p
  • D3lt@0n3
  • mysql -u delta one -p < Sola_30_Schema_MySQL.sql

  • RPM Failure
  • rpm -qp --scripts SolaDDM-3.0.0.x86_64.rpm shows
  • /usr/bin/getent group deltaone || usr/sbin/groupadd -r delta one
  • /usr/bin/getent passed deltaone || /usr/sbin/useradd -r -d /usr/local/deltaone -s /bin/false deltaone

  • mysql-workbench on CentOS7
  • sudo yum install epee-release
  • sudo yum install mysql-workbench


  • deltaone D3lt@0n3

How To Install MySQL on CentOS 7


https://www.digitalocean.com/community/tutorials/how-to-install-mysql-on-centos-7


How To Install MySQL on CentOS 7

PostedDecember 1, 2016 130.3kviews MYSQL MARIADB CENTOS

Introduction

MySQL is an open-source database management system, commonly installed as part of the popular LEMP(Linux, Nginx, MySQL/MariaDB, PHP/Python/Perl) stack. It uses a relational database and SQL (Structured Query Language) to manage its data.
CentOS 7 prefers MariaDB, a fork of MySQL managed by the original MySQL developers and designed as a replacement for MySQL. If you run yum install mysql on CentOS 7, it is MariaDB that is installed rather than MySQL. If you're wondering about MySQL vs. MariaDB, MariaDB will generally work seamlessly in place of MySQL, so unless you have a specific use-case for MySQL, see the How To Install MariaDB on Centos 7 guide.
This tutorial will explain how to install MySQL version 5.7 on a CentOS 7 server.

Prerequisites

To follow this tutorial, you will need:
  • A CentOS 7 with a non-root user with sudo privileges. You can learn more about how to set up a user with these privileges in the Initial Server Setup with CentOS 7 guide.

Step 1 — Installing MySQL

As mentioned in the introduction, the Yum command to install MySQL in fact installs MariaDB. To install MySQL, we'll need to visit the MySQL community Yum Repository which provides packages for MySQL.
In a web browser, visit:
https://dev.mysql.com/downloads/repo/yum/
Note that the prominent Download links don't lead directly to the files. Instead, they lead to a subsequent page where you're invited to log in or sign up for an account. If you don't want to create an account, you can locate the text "No thanks, just start my download", then right-click and copy the link location, or you can edit the version number in the commands below.
Locate the desired version, and update it as needed in the link below:
Screencapture highlighting current yum repo name
  • wget https://dev.mysql.com/get/mysql57-community-release-el7-9.noarch.rpm
Once the rpm file is saved, we will verify the integrity of the download by running md5sum and comparing it with the corresponding MD5 value listed on the site:
  • md5sum mysql57-community-release-el7-9.noarch.rpm
Output
1a29601dc380ef2c7bc25e2a0e25d31e mysql57-community-release-el7-9.noarch.rpm
Compare this output with the appropriate MD5 value on the site:
Screencapture highlighting md5dsum
Now that we've verified that the file wasn't corrupted or changed, we'll install the package:
  • sudo rpm -ivh mysql57-community-release-el7-9.noarch.rpm
This adds two new MySQL yum repositories, and we can now use them to install MySQL server:
  • sudo yum install mysql-server
Press y to confirm that you want to proceed. Since we've just added the package, we'll also be prompted to accept its GPG key. Press y to download it and complete the install.

Step 2 — Starting MySQL

We'll start the daemon with the following command:
  • sudo systemctl start mysqld
systemctl doesn't display the outcome of all service management commands, so to be sure we succeeded, we'll use the following command:
  • sudo systemctl status mysqld
If MySQL has successfully started, the output should contain Active: active (running) and the final line should look something like:
  • Dec 01 19:02:20 centos-512mb-sfo2-02 systemd[1]: Started MySQL Server.
Note: MySQL is automatically enabled to start at boot when it is installed. You can change that default behavior with sudo systemctl disable mysqld
During the installation process, a temporary password is generated for the MySQL root user. Locate it in the mysqld.log with this command:
  • sudo grep 'temporary password' /var/log/mysqld.log
Output
2016-12-01T00:22:31.416107Z 1 [Note] A temporary password is generated for root@localhost: mqRfBU_3Xk>r
Make note of the password, which you will need in the next step to secure the installation and where you will be forced to change it. The default password policy requires 12 characters, with at least one uppercase letter, one lowercase letter, one number and one special character.

Step 3 — Configuring MySQL

MySQL includes a security script to change some of the less secure default options for things like remote root logins and sample users.
Use this command to run the security script.
  • sudo mysql_secure_installation
This will prompt you for the default root password. As soon as you enter it, you will be required to change it.
Output
The existing password for the user account root has expired. Please set a new password. New password:
Enter a new 12-character password that contains at least one uppercase letter, one lowercase letter, one number and one special character. Re-enter it when prompted.
You'll receive feedback on the strength of your new password, and then you'll be immediately prompted to change it again. Since you just did, you can confidently say No:
Output
Estimated strength of the password: 100 Change the password for root ? (Press y|Y for Yes, any other key for No) :
After we decline the prompt to change the password again, we'll press Y and then ENTER to all the subsequent questions in order to remove anonymous users, disallow remote root login, remove the test database and access to it, and reload the privilege tables.
Now that we've secured the installation, let's test it.

Step 4 — Testing MySQL

We can verify our installation and get information about it by connecting with the mysqladmin tool, a client that lets you run administrative commands. Use the following command to connect to MySQL as root (-u root), prompt for a password (-p), and return the version.
  • mysqladmin -u root -p version
You should see output similar to this:
Output
mysqladmin  Ver 8.42 Distrib 5.7.16, for Linux on x86_64
Copyright (c) 2000, 2016, Oracle and/or its affiliates. All rights reserved.

Oracle is a registered trademark of Oracle Corporation and/or its
affiliates. Other names may be trademarks of their respective
owners.

Server version          5.7.16
Protocol version        10
Connection              Localhost via UNIX socket
UNIX socket             /var/lib/mysql/mysql.sock
Uptime:                 2 min 17 sec

Threads: 1  Questions: 6  Slow queries: 0  Opens: 107  Flush tables: 1  Open tables: 100  Queries per second avg: 0.043
This indicates your installation has been successful. 

Conclusion

In this tutorial, we've installed and secured MySQL on a CentOS 7 server. To learn more about using MySQL, this guide to learning more about MySQL commands can help. You might also consider implementing some additional security measures.

2023 Promox on Morefine N6000 16GB 512GB

2023 Promox on Morefine N6000 16GB 512GB Software Etcher 100MB (not but can be rufus-4.3.exe 1.4MB) Proxmox VE 7.4 ISO Installer (1st ISO re...