https://osric.com/chris/accidental-developer/2020/04/modifying-a-packet-capture-with-scapy/
dump
sudo tcpdump -i enp6s0 -w dns.pcap port 53
host -t a mediacropolis.osric.com
check
tcpdump -n -r dns.pcap
install
mkdir mod_pcap
cd mod_pcap
python3 -m venv venv
source venv/bin/activate
pip install scapy
scapy
scapy
packets = rdpcap("/home/chris/dns.pcap")
packets[0]
modify without rebuild
request = packets[0]
reply = packets[1]
request["DNSQR"].qname = b'supercalifragilisticexpialidocious.osric.net'
reply["DNSRR"].rrname = b'supercalifragilisticexpialidocious.osric.net'
reply["DNSRR"].rdata = b'10.0.100.7'
packets = [request, reply]
wrpcap("/home/chris/dns-modified.pcap", packets)
modify with rebuild
del request['IP'].len
del request['IP'].chksum
del request['UDP'].len
del request['UDP'].chksum
del reply['IP'].len
del reply['IP'].chksum
del reply['UDP'].len
del reply['UDP'].chksum
request = Ether(request.build())
reply = Ether(reply.build())
packets = PacketList([request, reply])
wrpcap("/home/chris/dns-modified.pcap", packets)
exit()
Original
Modifying a packet capture with Scapy
My motivation was to start from a known good packet capture, for example, a DNS request and reply, and modify that request to create something interesting: an example to examine in Wireshark, or positive and negative test cases for an IDS software (Snort, Suricata).
I haven’t done much with Scapy before, but it seemed like the right tool for the task. My planned steps were as follows:
All the commands shown were run on an Ubuntu 18.04 LTS VM running on VirtualBox, but should work on any Linux host with Python3, Scapy, and tcpdump.
1. Take pcap (packet capture)
In one terminal I ran tcpdump, capturing only port 53 traffic:
$ sudo tcpdump -i enp0s3 -w dns.pcap port 53
tcpdump: listening on enp0s3, link-type EN10MB (Ethernet), capture size 262144 bytes
^C2 packets captured
2 packets received by filter
0 packets dropped by kernel
In another terminal I generated a DNS request. I limited it to A records to reduce the number of packets generated:
$ host -t a mediacropolis.osric.com
mediacropolis.osric.com has address 216.154.220.53
I confirmed it worked:
$ tcpdump -n -r dns.pcap
reading from file dns.pcap, link-type EN10MB (Ethernet)
19:51:29.207334 IP 192.168.1.56.57241 > 192.168.1.1.53: 58127+ A? mediacropolis.osric.com. (41)
19:51:29.247780 IP 192.168.1.1.53 > 192.168.1.56.57241: 58127 1/0/0 A 216.154.220.53 (57)
2. Import pcap via scapy
First I set up a virtual environment. This was probably unnecessary, but is a habit I have when starting any new Python project:
mkdir mod_pcap
cd mod_pcap
python3 -m venv venv
source venv/bin/activate
pip install scapy
Then I ran Scapy and imported the packet capture:
$ scapy
>>> packets = rdpcap("/home/chris/dns.pcap")
3. Change pcap
First I looked at the packets in Scapy just to see what the objects looked like:
>>> packets[0]
<Ether  dst=fc:ec:da:7b:02:cf src=08:00:27:f0:43:22 type=IPv4 |<IP  version=4 ihl=5 tos=0x0 len=69 id=2453 flags=DF frag=0 ttl=64 proto=udp chksum=0xad89 src=192.168.1.56 dst=192.168.1.1 |<UDP  sport=57241 dport=domain len=49 chksum=0x83cc |<DNS  id=58127 qr=0 opcode=QUERY aa=0 tc=0 rd=1 ra=0 z=0 ad=0 cd=0 rcode=ok qdcount=1 ancount=0 nscount=0 arcount=0 qd=<DNSQR  qname='mediacropolis.osric.com.' qtype=A qclass=IN |> an=None ns=None ar=None |>>>>
>>> packets[1]
<Ether  dst=08:00:27:f0:43:22 src=fc:ec:da:7b:02:cf type=IPv4 |<IP  version=4 ihl=5 tos=0x0 len=85 id=30039 flags=DF frag=0 ttl=64 proto=udp chksum=0x41b7 src=192.168.1.1 dst=192.168.1.56 |<UDP  sport=domain dport=57241 len=65 chksum=0x1cff |<DNS  id=58127 qr=1 opcode=QUERY aa=0 tc=0 rd=1 ra=1 z=0 ad=0 cd=0 rcode=ok qdcount=1 ancount=1 nscount=0 arcount=0 qd=<DNSQR  qname='mediacropolis.osric.com.' qtype=A qclass=IN |> an=<DNSRR  rrname='mediacropolis.osric.com.' type=A rclass=IN ttl=600 rdlen=None rdata=216.154.220.53 |> ns=None ar=None |>>>>
2 packets: one request, one reply.
What if I wanted to change the packets so that the request and reply are instead for supercalifragilisticexpialidocious.osric.net? And the record data is 10.0.100.7?
>>> request = packets[0]
>>> reply = packets[1]
>>> request["DNSQR"].qname = b'supercalifragilisticexpialidocious.osric.net'
>>> reply["DNSRR"].rrname = b'supercalifragilisticexpialidocious.osric.net'
>>> reply["DNSRR"].rdata = b'10.0.100.7'
>>> packets = [request, reply]
>>> wrpcap("/home/chris/dns-modified.pcap", packets)
>>> exit()
Can tcpdump still read it?
$ tcpdump -n -r dns-modified.pcap
reading from file dns-modified.pcap, link-type EN10MB (Ethernet)
19:51:29.207334 IP 192.168.1.56.57241 > 192.168.1.1.53: 58127+[|domain]
19:51:29.247780 IP 192.168.1.1.53 > 192.168.1.56.57241: 58127 1/0/0 (57)
That doesn’t look quite right. What about tshark?
$ tshark -r dns-modified.pcap
    1   0.000000 192.168.1.56 → 192.168.1.1  DNS 83 Standard query 0xe30f[Malformed Packet]
    2   0.040446  192.168.1.1 → 192.168.1.56 DNS 99 Standard query response 0xe30f A mediacropolis.osric.com[Malformed Packet]
It looks unhappy: Malformed Packet. What went wrong?
Oh! The length and the checksum in both the IP header and the UDP header are incorrect.
Searching around for how to address this led me to How to calculate a packet checksum without sending it? on StackOverflow. It suggested deleting the checksums and rebuilding the packets, and Scapy would automatically calculate the checksums.
A tangent on using __class__:
I thought it inadvisable to use “magic” objects (see https://www.python.org/dev/peps/pep-0008/#descriptive-naming-styles) like __class__ as in the example on StackOverflow. But it does make sense:
>>> type(reply)
<class 'scapy.layers.l2.Ether'>
>>> reply.__class__
<class 'scapy.layers.l2.Ether'>
>>> type(reply['IP'])
<class 'scapy.layers.inet.IP'>
>>> reply['IP'].__class__
<class 'scapy.layers.inet.IP'>
No matter what subclass of a packet layer you have, __class__ will give you the right subclass.
Back to the task at hand. I ended up deleting the length (len) and checksum (chksum) from both the IP layer and the UDP layer and rebuilt the packets:
>>> del request['IP'].len
>>> del request['IP'].chksum
>>> del request['UDP'].len
>>> del request['UDP'].chksum
>>> del reply['IP'].len
>>> del reply['IP'].chksum
>>> del reply['UDP'].len
>>> del reply['UDP'].chksum
>>> # rebuild packets
>>> request = Ether(request.build())
>>> reply = Ether(reply.build())
[Note: I also changed the host request from supercalifragilisticexpialidocious.osric.net to example.osric.net. I also included the trailing dot in the request and reply: b'example.osric.net.']
Then I re-built the PacketList:
>>> packets = PacketList([request, reply])4. Export pcap
Scapy’s wrpcap function takes a destination filename and a PacketList object (scapy.plist.PacketList).
wrpcap("/home/chris/mod_dns.pcap", packets)Did it work?
$ tcpdump -n -r mod_dns.pcap
reading from file mod_dns.pcap, link-type EN10MB (Ethernet)
14:16:40.005857 IP 192.168.1.56.57241 > 192.168.1.1.53: 58127+ A? example.osric.net. (35)
14:18:34.295393 IP 192.168.1.1.53 > 192.168.1.56.57241: 58127 1/0/0 A 10.0.100.7 (68)
$ tshark -r mod_dns.pcap
1 0.000000 192.168.1.56 → 192.168.1.1 DNS 77 Standard query 0xe30f A example.osric.net
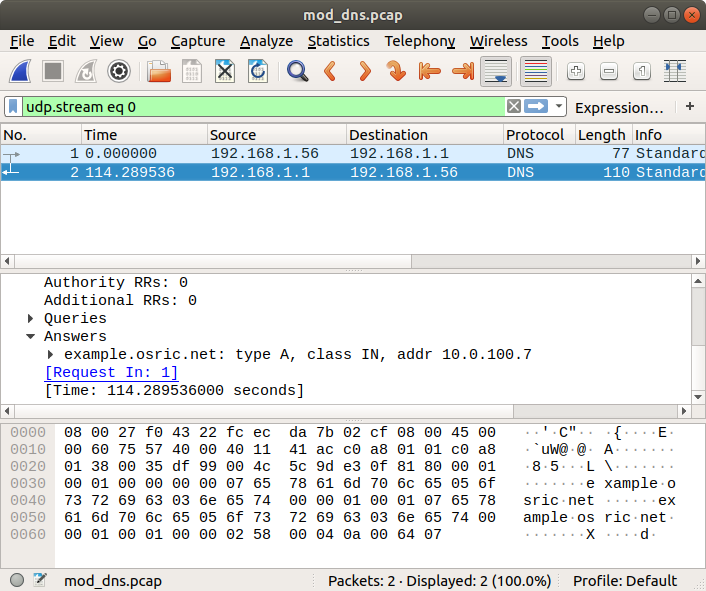
2 114.289536 192.168.1.1 → 192.168.1.56 DNS 110 Standard query response 0xe30f A example.osric.net A 10.0.100.7Success!
5. View pcap in Wireshark
If it worked in tcpdump and tshark, I expected it to work in Wireshark, but I wanted to make sure:
A note on packet timestamps:
I don’t see any timestamp data when I view the packets in Scapy, but tcpdump shows timestamps:
$ tcpdump -n -r mod_dns.pcap
reading from file mod_dns.pcap, link-type EN10MB (Ethernet)
14:16:40.005857 IP 192.168.1.56.57241 > 192.168.1.1.53: 58127+ A? example.osric.net. (35)
14:18:34.295393 IP 192.168.1.1.53 > 192.168.1.56.57241: 58127 1/0/0 A 10.0.100.7 (68)
How can I modify the timestamps? The timestamps appear to be the time the packet was created/rebuilt by Scapy. I would like to have better control of this, but I have not yet found a way to do that. Please leave a comment if you know of a way to do this!

沒有留言:
張貼留言